Accessing ODBC data sources from Apache OpenOffice, LibreOffice, and OpenOffice.org
Contents
- Introduction
- Connecting to an ODBC data source
- Using Calc with ODBC data sources
- Using Base queries and forms with ODBC data sources
- Using Writer with ODBC data sources
Introduction
The Apache OpenOffice productivity suite was previously known as Oracle Open Office and OpenOffice.org. LibreOffice was initially derived from the OpenOffice.org source code.
This article describes how to use OpenOffice, LibreOffice, and OpenOffice.org applications (Base databases and Calc spreadsheets) to access databases for which an ODBC driver is available. You can access databases such as Microsoft SQL Server, Microsoft Access, Oracle, Salesforce, DB2, Derby, InterBase, and Sybase ASE from Base and Calc even when the database is on a different machine to the one where these applications are being run.
Connecting to an ODBC data source
When testing Easysoft ODBC drivers with Apache OpenOffice and LibreOffice, we used both the unixODBC Driver Manager included with the operating system and the Easysoft ODBC driver distribution. As both Apache OpenOffice and LibreOffice are built with threads, make sure that you specify the thread-safe ODBC-ODBC Bridge client driver (OOB_r), if you're using the ODBC-ODBC Bridge.
To use an Easysoft ODBC driver with OpenOffice.org, ensure that the unixODBC Driver Manager is installed and that the Easysoft ODBC driver is installed as an ODBC driver under unixODBC. If unixODBC is not installed already, install the version that comes with the Easysoft ODBC driver distribution. OpenOffice.org is built with threads, so if you build unixODBC yourself, use --enable-threads=yes on the configure line. If you're using the ODBC-ODBC Bridge, make sure that you specify the thread-safe ODBC-ODBC Bridge client driver (OOB_r) when creating data sources for use with OpenOffice.org. For earlier ODBC-ODBC Bridge releases, the thread-safe client is contained in distributions that contain -mt in their file name.
Before trying to use ODBC in OpenOffice, create an ODBC data source and test it with unixODBC's isql utility.
If you have the GUI unixODBC programs (you need QT for these), you can use ODBCConfig to create Easysoft ODBC driver data sources. Otherwise, you will have to edit the unixODBC odbc.ini file to add data sources. For information about adding an ODBC-ODBC Bridge data source, refer to DSN_definition.txt and example_odbc.ini in the install_dir/easysoft/oob/doc directory or the ODBC-ODBC Bridge documentation. For information about adding a data source for a different Easysoft ODBC driver, refer to the documentation for your Easysoft ODBC driver.
After you've created your data source and tested it with isql, you can use it from OpenOffice applications such as Base, Calc, and Writer.
Connecting to an ODBC data source from Apache OpenOffice 3, LibreOffice 3 and OpenOffice.org 2.0
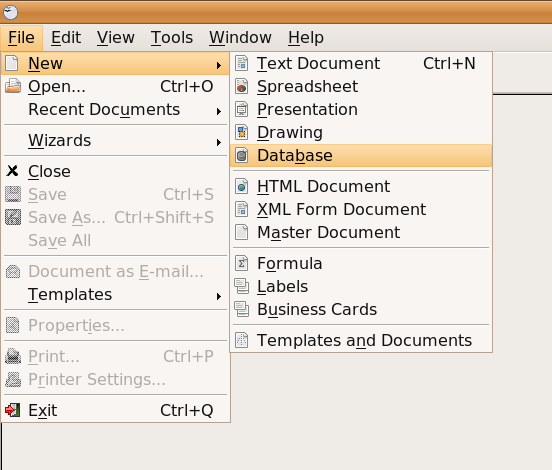
- Choose File > New > Database.
- Choose Connect to an existing database.
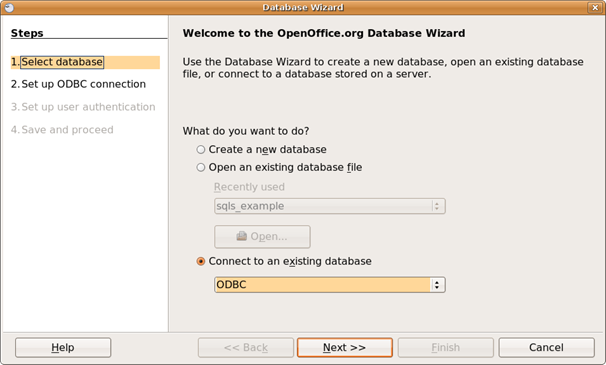
- Choose ODBC in the list, and then choose Next.
- Choose Browse, double-click your data source, and then choose Next.
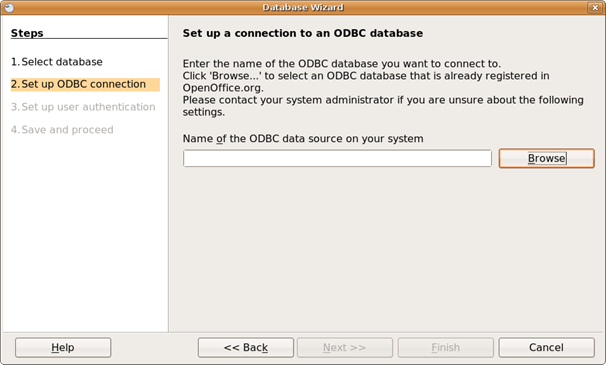
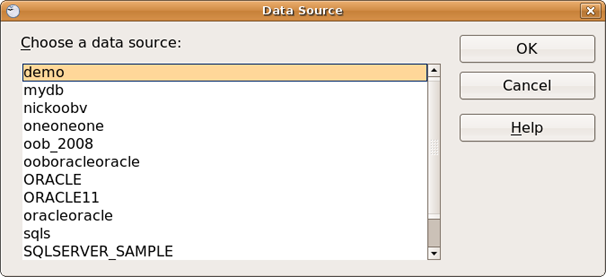
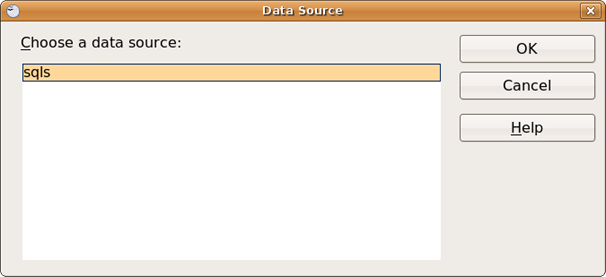
If your data source is not listed, check the
odbc.inifile.Note When testing with Apache OpenOffice, browsing for data sources failed with the error "Could not load the program library
libodbc.soor it is corrupted. The ODBC data source selection is not available." To work around this, we entered the name of our Easysoft ODBC data source in the space provided in the dialog box. You can enter the name of a system or user data source (defined for the user who is running Base). To find out the name of the data source look at the relevant.inifile. (Runodbcinst -jin a terminal window to find out the.inifile location.) - If your database requires a database user name, enter it in the User name box. If this user needs to supply a password choose the Password required check box.
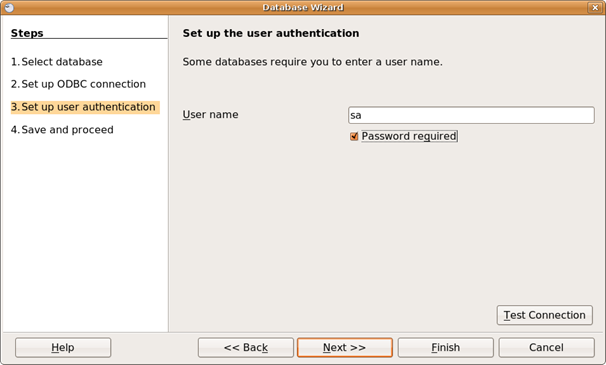
- Choose Finish.
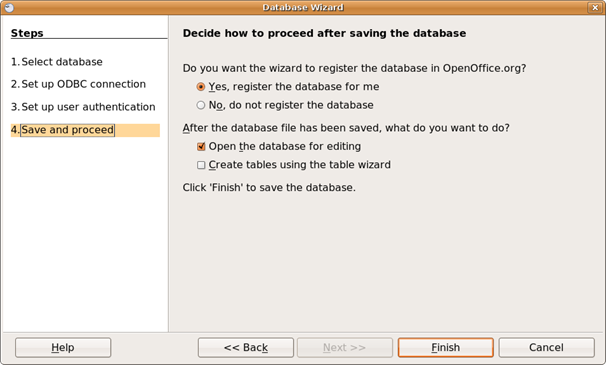
- Save the database when prompted.
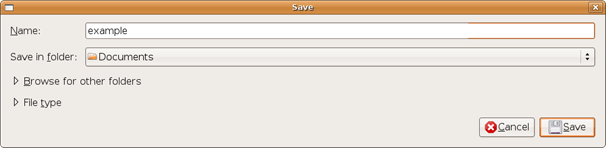
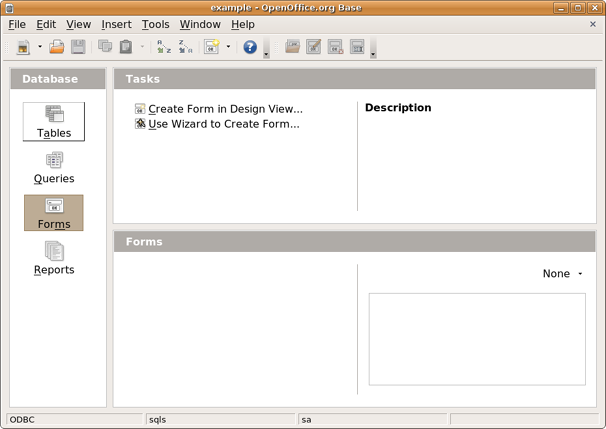
The database opens in a new Base window. From here you can access your data.
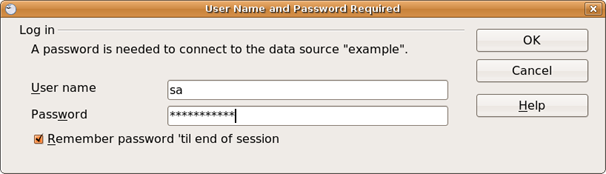
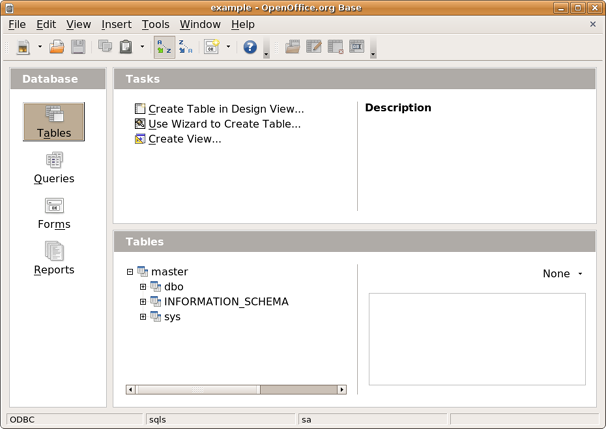
- In the left pane of the database window, choose the Tables icon to display a hierarchy of tables. Enter the database password if prompted, and then choose OK.
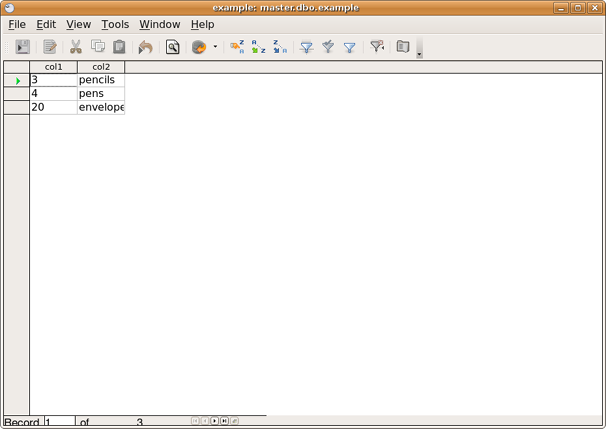
- To retrieve the data in a table, in the Tables pane, double-click a table.
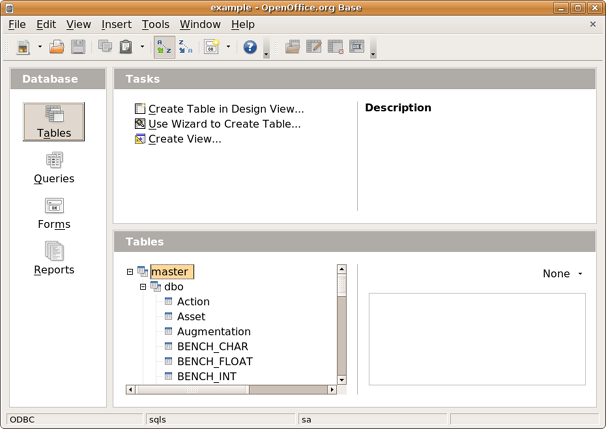
- Choose the Queries icon to create a query.
Use any of the methods listed in the Tasks pane to create a query.
Connecting to an ODBC data source from OpenOffice.org 1.0
- Choose Tools > Data Sources.
A dialog box containing General, ODBC, Tables, Queries, and Links tabs is displayed.
- Choose New Data Source, and then in the Name box, enter a name to use for this data source in OpenOffice.org.
- In the Database type list, choose ODBC.
- The Data source URL box now contains
sdbc:odbc:. Choose the ellipses (...) next to this box to display the ODBC data sources that unixODBC knows about. Double-click one.If your data source is not in this list, check the
odbc.inifile. - Choose the ODBC tab. If your database requires a database user name, enter it in the User name box. If this user needs to supply a password, choose the Password required check box.
- Choose the Tables tab to display a hierarchy of tables. Enter the database password if prompted, and then choose OK.
- Choose the Queries tab to create a query.
Save the data source when prompted.
At the time of testing (using OpenOffice.org 1.0.1), queries created in Design View or executed in any mode other than Run SQL command directly won't work in databases that use multipart names (
catalog.schema.table). Refer to instance 10577 at https://bz.apache.org/ooo/show_bug.cgi?id=10577.Until 10577 is fixed, you must switch Design View off and choose Run SQL command directly to get any data back from databases that use multipart names. In this case, the data will be read-only.
Red Hat 8.0 and the ODBC-ODBC Bridge
Red Hat 8.0 comes with unixODBC 2.2.2, which is installed with a --prefix of /usr. As a result, odbcinst is in /usr/bin/odbcinst and libodbc.so is in /usr/lib. ODBC-ODBC Bridge distributions before 1.1.0.4 do not expect to find unixODBC in these places and will ask if you have unixODBC installed and where it is.
The unixODBC that comes with Red Hat appears to have been built with --sysconfdir=/etc, so the odbc.ini and odbcinst.ini files should be in /etc.
When you install the ODBC-ODBC Bridge (pre 1.1.0.4) on Red Hat 8, it may fail to locate the existing unixODBC, in which case you have these alternatives:
- Accept the fact the ODBC-ODBC Bridge installation does not find the existing unixODBC and answer
Yesto install the unixODBC that comes with the ODBC-ODBC Bridge. The ODBC-ODBC Bridge installation needsodbcinstandlibodbcinst.soto install the ODBC-ODBC Bridge client into unixODBC. Once the ODBC-ODBC Bridge is installed under unixODBC, you can delete/usr/local/easysoft/unixODBC. - When asked if you already have unixODBC installed, say
Yesand enter/usras the path to unixODBC. This will use your existingodbcinstto install the ODBC-ODBC Bridge. When asked if you want to install the ODBC-ODBC Bridge as an ODBC driver under unixODBC, answerYes.
Using Calc with ODBC data sources
After you have registered your ODBC data source, the external ODBC data is then available to OpenOffice applications. This example shows how to connect Calc to databases such as SQL Server, Oracle, InterBase, and Sybase. Calc is the OpenOffice spreadsheet program.
- In Calc, choose View > Data Sources or press the F4 key.
The Data Sources pane opens at the top of the Calc window.
- In the left Data Sources pane, double-click your ODBC data source.
- Do one of the following:
- To make all the data in a table available to your Calc spreadsheet, double-click Tables.
- To make the results of a query available to your Calc spreadsheet, double-click Queries.
- Double-click the table or query that will retrieve the data you want to copy into Calc.
- To filter the data in Calc before copying it, do one of the following:
- Choose
 and then define the filter criteria.
 - Click in a field that contains the value you want to filter records with, and then choose Data > Filter > Auto Filter.
For example, to display the details of AdventureWorks customers who are from a particular territory, click in the TerritoryID and then choose
 . Calc now only displays records from the territory that you chose.
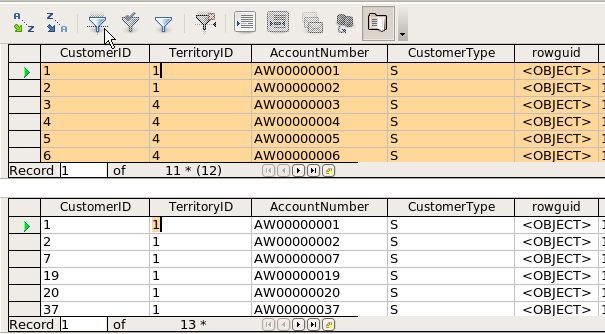
To remove the Calc filter, choose
 .
. - Choose
- To copy the data to Calc, drag the data from the right Data Sources pane to your spreadsheet:
- To import all records from the result set, drag the top left
 to an empty spreadsheet cell.
 - To import a row, in the row that you want, drag the
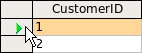 to an empty spreadsheet cell.
To select multiple adjacent rows, hold down the Shift key and choose the rows that you want. To select multiple non-adjacent rows, hold down the CTRL key.
To keep the spreadsheet data current with the data in the underlying database table, Choose Data > Refresh Range.
- To import all records from the result set, drag the top left
Creating DataPilot tables from ODBC data
A DataPilot is an interactive table that enables you display data in more than one way. You can manipulate the rows and columns in a DataPilot table to view or summarise the data in different ways for the purposes of analysis. DataPilots also allow you to apply spreadsheet functions to the data.
This example shows how to use an external ODBC data source as the source for a DataPilot table.
- Import the ODBC data that you want to analyse with the DataPilot table.
- In Calc, select the data you want to base the DataPilot table on.
Include the column headings.
- Choose Data > DataPilot > Start.
- In the Select Source dialog box, select Current Selection and choose OK.
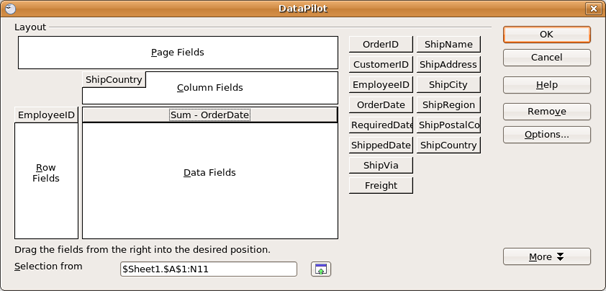
The DataPilot dialog box is displayed. The dialog box shows you a diagram of the DataPilot that you are creating. The table column headings are displayed as dialog box buttons. To create the DataPilot, you drag these buttons to the dialog box's layout areas: Column, Row, and Data.
- Drag the required fields to one of the three areas.
If you drag a column button to the Column or Row area, it becomes the first cell in a row or column of the DataPilot. If you drag a column button to the Data area, it becomes the data in the DataPilot.
This example DataPilot shown in the screenshot uses the Northwind Orders table as its source data. In the example, ShipCountry is the column, EmployeeID the row, and OrderDate the column.
- Double-click the column button in the Data Fields area.
The Data Field dialog box is displayed.
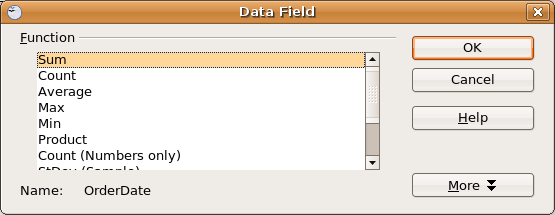
- Use the dialog box to select the Calc function that you want to use to manipulate the data in the Data Area. The example DataPilot uses the
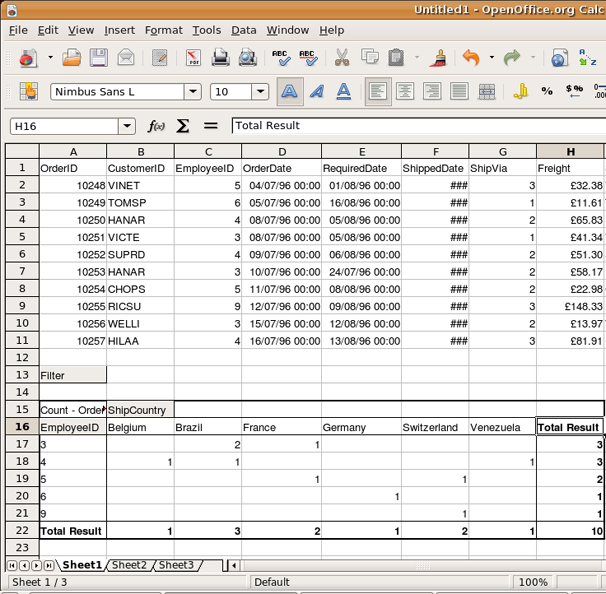
Countfunction to count the number of orders each Northwind sales person took in each country. - Choose OK to exit the DataPilot configuration dialog boxes.
The DataPilot is displayed below the source data in the Calc spreadsheet. The example DataPilot makes it easy to find out how many orders each employee took, broken down by country.
- To change how the DataPilot displays the information, you can drag the columns to new positions. For example, the following DataPilot was produced by dragging the ShipCountry column below the EmployeeID column.
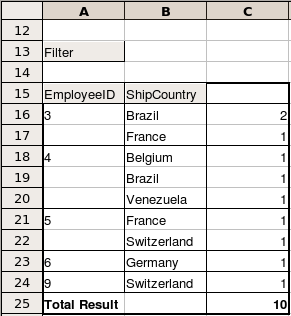
If the source data changes, choose Data > DataPilot > Refresh to update the DataPilot. If you no longer need the DataPilot, choose Data > DataPilot > Delete.
Using a Base query as DataPilot source data
Calc lets you use a database query created in Base as the source data for a DataPilot. You can use the query to selectively retrieve the data you want before importing it into Calc.
This section shows how to use a Base query and a Calc DataPilot to create a sales report from external ODBC data that shows how well sales representatives are doing and which products are selling the most.
To follow the examples in this section, create a SQL Server ODBC driver or ODBC-ODBC Bridge data source that connects to a SQL Server instance that serves the Northwind database. Alternatively, create an Access ODBC driver data source that connects to the Northwind database.
Creating a Base query from ODBC data
To find out how much each sales representative has sold, create a query that retrieves the:
- Name of each sales representative.
- Name of each product.
- Amount sold.
- Dates of the orders.
- Create an OpenOffice database document for an ODBC data source that connects to the Northwind database.
- In the Database pane, choose Queries.
- In the Tasks pane, choose Create Query in Design View.
The Query Design window prompts you to add a table or query.
- Choose Employees and choose Add to add the Employees table to the Query Design window.
- Repeat the previous step to add the Products, Orders, Order Subtotals, and Order Details table.
- Choose Close.
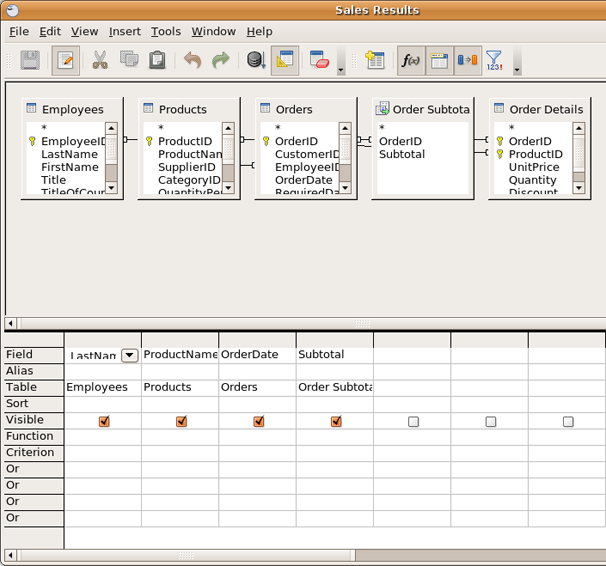
- In the lower pane of the Query Design window, choose:
- Employees.LastName in the first field.
- Products.ProductName in the second field.
- Orders.OrderDate in the third field.
- Order Subtotals.Subtotal in the fourth field.
- Choose Insert > New Relation.
The Join Properties dialog box is displayed.
- In the Tables involved area, choose Employees and Orders.
- In the Fields involved area, choose EmployeeID in both fields.
- Leave the join type set to the default value Inner join, and then choose OK.
- Repeat the previous three steps to join the OrderID fields in the Orders and Order Subtotals tables.
- Choose File > Save and save the query as Sales Results.
- Choose File > Exit to close the Query Design window and return to the database document.
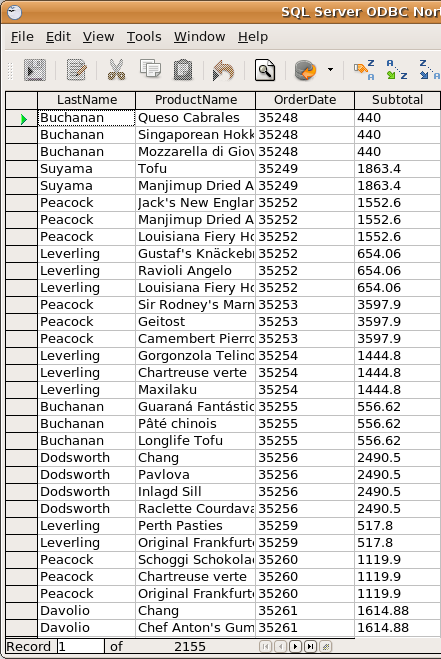
- In the Queries pane, double-click Sales Results to run the query.
Creating a DataPilot from a Base query
Now that you have the raw data you need, you can use Calc to summarise the information. The following example shows how to compare the number of products sold by each sales representative.
- In a Calc spreadsheet, choose Data > DataPilot > Start.
The Select Source dialog box is displayed.
- Choose Data source registered in OpenOffice.org and choose OK.
The Select Data Source dialog box is displayed.
- Set the dialog box options to the following values, and then choose OK.
Setting Value Database The OpenOffice database that you saved the Sales Results query in. Type Query. Data Source Sales Results. The DataPilot dialog box is displayed.
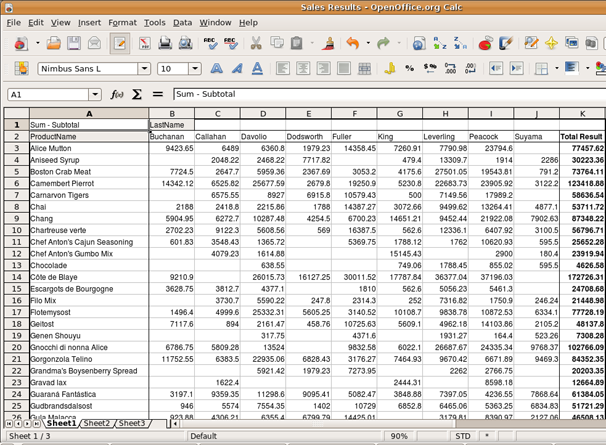
- Drag the LastName column button to the Column Fields. area.
- Drag the ProductName column button to the Row Fields area.
- Drag the Subtotal column button to the Data Fields area, and then choose OK.
- The resulting DataPilot table summarises the data for you:
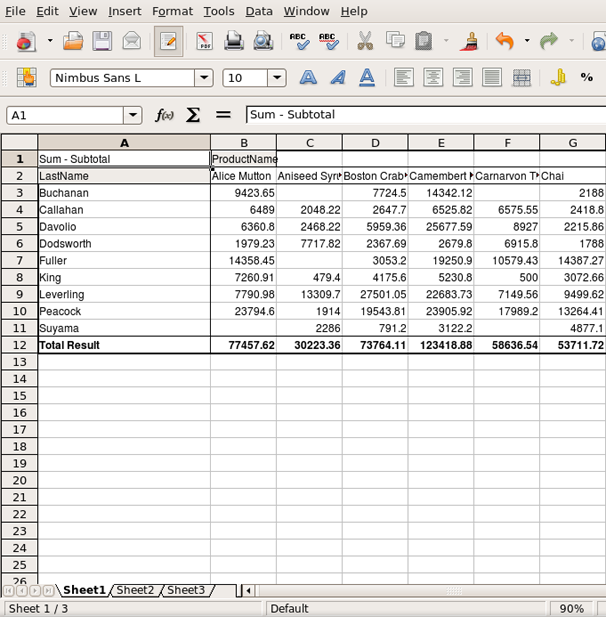
A DataPilot table is dynamic; you can transpose its rows and columns to display different summaries of the data. For example, you can change the layout of the Sales Results DataPilot products are displayed across the columns, and sales representatives are listed down each row.
- In the Calc spreadsheet, choose any cell in the DataPilot table.
- Choose Data > DataPilot > Start.
- Switch the positions of the LastName and ProductName fields.
Do this by dragging the LastName button to the Row Fields area and the ProductName button to the Column Fields. area. Choose OK.
- The DataPilot table displays the data in the new layout:
DataPilots and Datetime fields
At the time of testing (using OpenOffice.org 2.3.0), datetime values will not import into a DataPilot table. In the DataPilot table, cells containing Datetime fields are marked as (empty). Refer to instance 53244 at:
https://bz.apache.org/ooo/show_bug.cgi?id=53244
Using Base queries and forms with ODBC data sources
To follow the examples in this section, create a SQL Server ODBC driver or ODBC-ODBC Bridge data source that connects to a SQL Server instance that serves the Northwind database. Alternatively, create an Access ODBC driver data source that connects to the Northwind database.
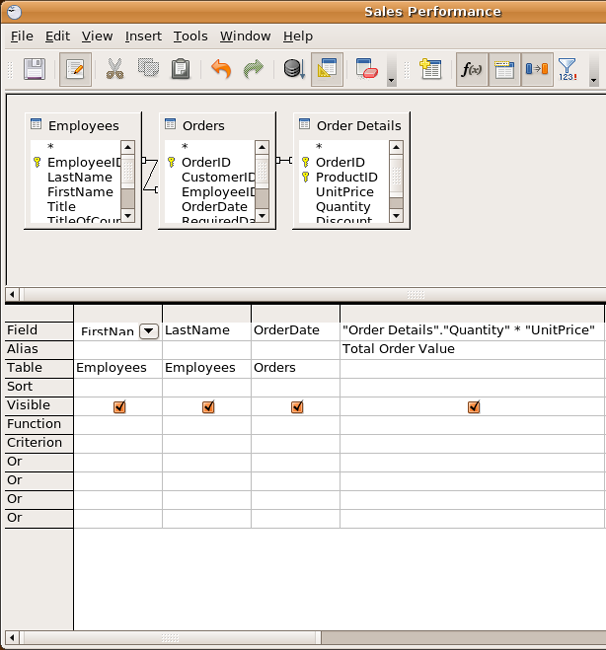
Using calculated fields in a Base query
Calculated fields derive their values from data that exists elsewhere in the database. The example query in this section uses a calculated field to work out the total value of each order in the Northwind Orders table. The calculated field does this by multiplying the Quantity column value by the UnitPrice column value. The calculation produces a value in the query result set that is derived from but not stored in the database table.
- Create an OpenOffice database document for an ODBC data source that connects to the Northwind database.
- In the Database pane, choose Queries.
- In the Tasks pane, choose Create Query in Design View.
- In the Tables list, double-click Employees, Orders, and Order Details, and then choose Close.
- In the upper pane of the Query Design window, double-click:
- LastName and FirstName in the Employees table.
- OrderDate in the Orders table.
- In the lower pane of the Query Design window, choose Order Details in the first available Table cell.
- In the first available Field cell, enter this formula:
Quantity * UnitPrice
The formula calculates the total value of each order.
- In the Alias cell below this formula, enter Total Order Value.
The Alias cell lets you change the default column heading that displays when you retrieve the query data in Base and other OpenOffice applications. By default, OpenOffice displays the formula value ("Order Details"."Quantity" * "UnitPrice") as the heading for this column.
- Choose File > Save and save the query as Sales Performance.
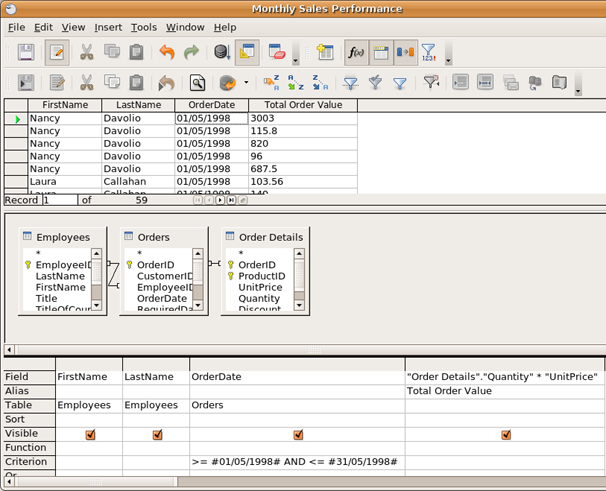
Filtering records with a criterion field
Criterion fields let you place restrictions on a query to help you find specific records that you want to work with. For example, instead of retrieving all orders received, you can create a criterion field that retrieves orders received in a particular month.
This section shows how to use a criterion field with an external ODBC data source to filter Northwind orders by month.
- Open the OpenOffice document where you saved the Sales Performance query.
- In the Database pane, choose Queries.
- In the Queries Pane, choose the Sales Results query.
- Choose Edit > Edit.
The query opens in Design View.
- In the lower pane of the Query Design window, in the OrderDate column, choose in the Criterion field.
- Enter the following filter to retrieve records for a particular month:
>= 01/05/98 AND <= 31/05/98
OpenOffice automatically delimits each date with hash (
#) characters, which the Criterion field syntax requires. - Choose Edit > Run Query to retrieve the query results or choose
 .
.
The filtered query results display in the upper pane. You many need to change the OrderDate column format. To do this, right-click the OrderDate column heading and choose Column Format. In the format code box, enter:
DD/MM/YY
- Choose File > Save As and save the query as Monthly Sales Performance.
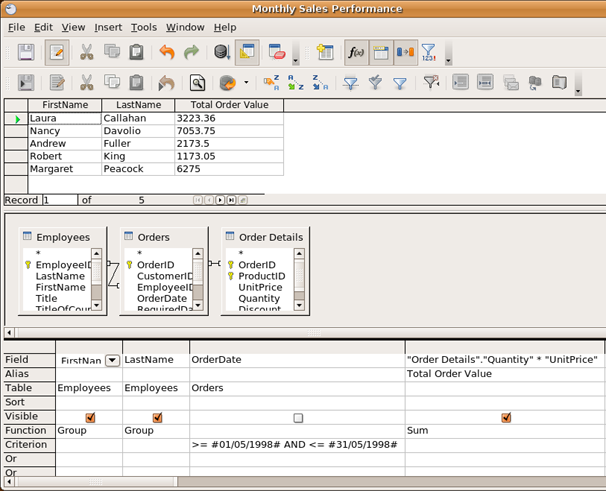
Changing the query sort order
Base lets you sort result set data on a particular column and choose whether the query results display in ascending or descending order.
This example query shows the total value of the orders taken by each Northwind sales rep. To rank the employees, the query sorts the records by order amount and displays the records in descending order. The larger the order amount, the earlier the employee displays in the query results.
- Open the Monthly Sales Performance query in Design View.
- In the FirstName column, choose Group in the Function field.
- Repeat the previous step for the LastName column.
- In the OrderDate column, click to clear the Visible field.
- In the Total Order Value column, choose Sum in the Function field.
- Choose to run the query.
The total order amount taken by each sales representative displays in the Results pane.
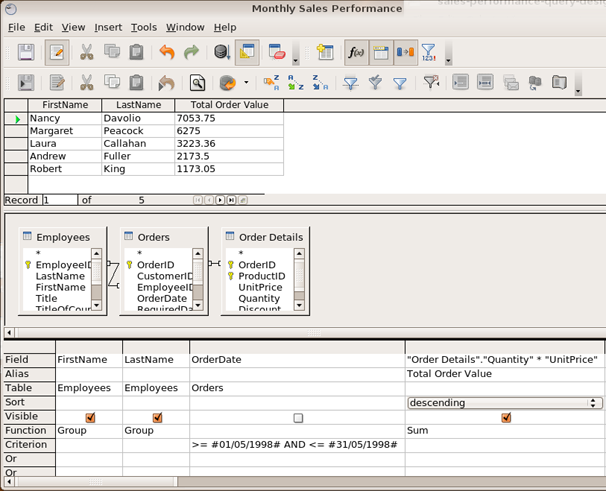
You can rank the sales representatives by sorting the order totals in descending order.
- In the Total Order Value column, choose descending in the Sort field and re-run the query.
Creating a data entry form for an ODBC data source
This section shows how to create a form that lets OpenOffice users create and display ODBC database records. The example form is based around the Northwind Products table.
- Open an OpenOffice database document for an ODBC data source that connects to the Northwind database.
- In the Database pane, choose Forms.
- In the Tasks pane, choose Use Wizard to Create Form.
The Form Wizard is displayed.
- In the Tables or queries list, choose the Northwind Products table.
- Select all columns apart from ProductID, and then choose
 to add the remaining table fields to the form. Choose Next.
 - Choose Next to move to the Arrange controls page.
- In the Arrangement of main form section, choose Columnar - Label Left. Choose Next to move to the Apply styles page..
- Choose the form layout format you want, and then choose Next.
- In the Name of the form box, enter Products.
- Choose Modify the form, and then choose Finish.
The form opens in Form Design View.
The available values for the SupplierID and CategoryID fields are defined in separate tables. To enable users to choose from a predefined list of supplier IDs and category IDs when entering data, change the form controls for these fields to list boxes that retrieve the available IDs.
- Hold down the CTRL key, and choose the SupplierID text box to select the control.
- Right-click the control, and then choose Replace With > List Box from the shortcut menu.
- Double-click the control to display the List Box properties dialog box. In the General tab, set the Drop down property to Yes.
- In the Data tab, set the Type of list contents property to SQL. In the List content box, enter:
SELECT "SupplierID", "SupplierID" FROM "Northwind"."dbo"."Suppliers"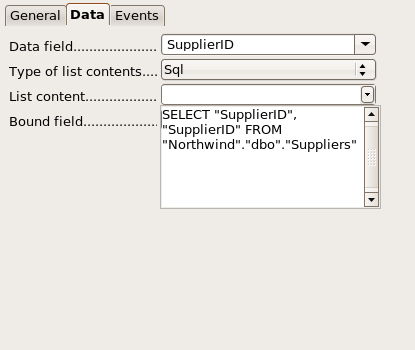
- Repeat the previous four steps for the CategoryID text box. Change the SQL for the list box's source data to:
SELECT "CategoryID", "CategoryID" FROM "Northwind"."dbo"."Categories" - To reduce the chance of data entry errors, make sure that the form field format is appropriate for the field's contents. For example, to prevent negative numbers from being entered in the UnitsInStock field, in the General Properties for this field, enter 0 in the Value minimum box.
You can also ensure that a form field value falls within a specific range. For example, if the unit price for a product is never above 1000, you can prevent prices above this value from being entered. To do this in the example form, hold down the CTRL key, select, and then double-click the UnitPrice box. In the Value maximum box, enter 1000. Note that although this method prevents values that are outside the range from being entered, OpenOffice does not prompt for a valid value. Instead, OpenOffice sets the value to the maximum permitted by the range. In the example form, if a value of 1100 is entered in the UnitPrice field, OpenOffice sets the value to 1000, which is valid but not necessarily correct.
- You can configure the form to automatically enter field values when user's add new records.
For example, to specify that a new Northwind product will be automatically reordered when stock levels fall to 10, set the ReorderLevel field's default value to 10. To do this, hold down the CTRL key and select the ReorderLevel text box, and then double-click the control. In the Default value box, enter 10. OpenOffice automatically sets this field's value to 10 when users add a new record.
- To exit Form Design View and use the form to display and add records, choose

The form opens in a Writer document and displays the first record from the Northwind Products table.
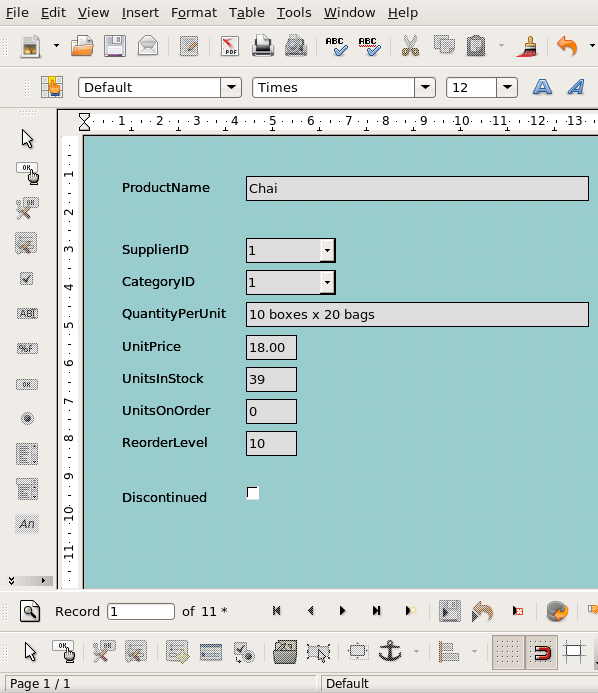
Use the
 to move through the records. To add a new record, choose
  .
.To return to Form Design View, choose
.
Using Writer with ODBC data sources
Writer is the OpenOffice word processing application. Writer can use external ODBC data either to display in a document or as a mail merge source.
When testing Writer with external data, we found that the program hung when importing data by using drag and drop. However there is an alternative method:
- In Writer, choose View > Data Sources or press the F4 key.
- In the left Data Sources pane, double-click your ODBC data source.
- Do one of the following:
- To make all the data in a table available to your Writer document, double-click Tables.
- To make the results of a query available to your Writer document, double-click Queries.
- Double-click the table or query that will retrieve the data you want to copy into Writer.
- In the right Data Sources pane, select the data that you want to copy into Writer.
- Choose the
 button.
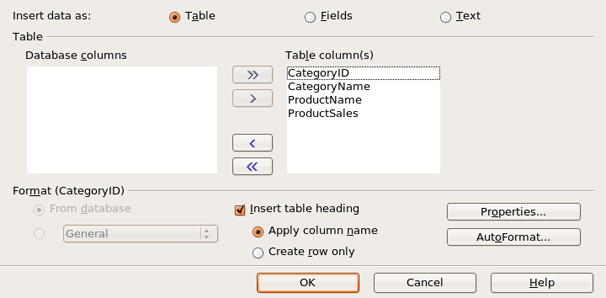
The Insert Database Columns dialog box is displayed.
- The Insert Database Columns dialog box lets you choose whether the external data is inserted as a table, a mail merge field or text. Use the Table area to choose which columns are inserted.
If you have chosen to import the data as a Writer table, do not use this dialog box to apply a table format. When testing Writer, we found that applying a table format by using this method changed the values of all text columns to 0. As a workaround, after you have inserted the external data:
- Insert another empty table into your Writer document.
- Apply the format you want to this table.
- Use the style paint brush to apply the empty table's format to the external data table.
- Choose OK to exit the Insert Database Columns dialog box.
The external ODBC data is inserted into the Writer document.
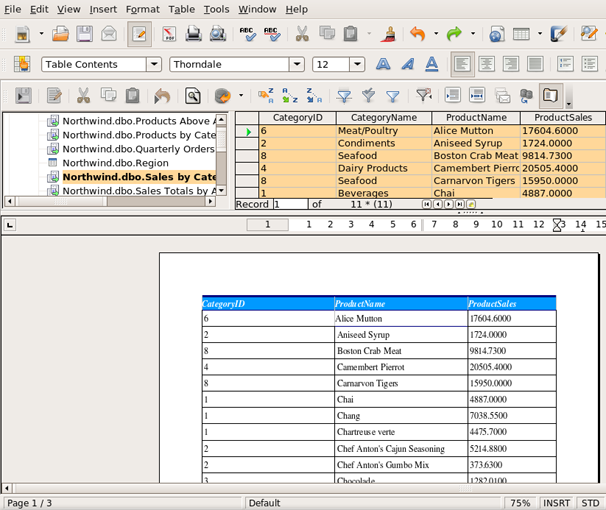
This example shows Northwind data stored in a SQL Server database in a Writer table.