Easysoft Administrator User Guide - File Mapping Tutorial
How to map Easysoft Administrator files
This section guides a user through the process of mapping a sample ISAM file into the Easysoft Administrator schema files.
- the required Easysoft Administrator software has been installed
- the sample files can be read successfully
- the data is being accessed from a Windows client machine and stored on a Unix server machine.
Chapter Guide
- Creating a data source
- Connecting to a data source
- Creating a new table
- Entering column attributes
- Saving a table and generating indexes
Creating a data source
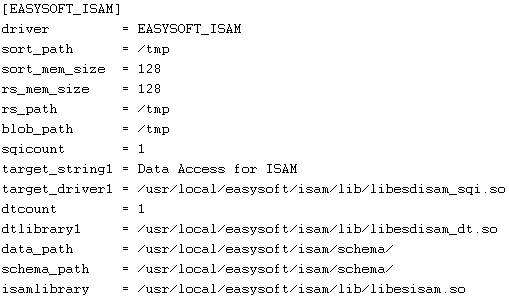
To demonstrate how to a map a new ISAM file it is necessary first to gain access to a blank schema file set on the Unix Server where the sample files reside.
For ease of demonstration there is a data source already set up on the server that contains a blank schema file set.
Look in the file /etc/odbc.ini by typing:
and search for the EASYSOFT_ISAM data source:
Create a new data source in order to gain access to the blank schema files:
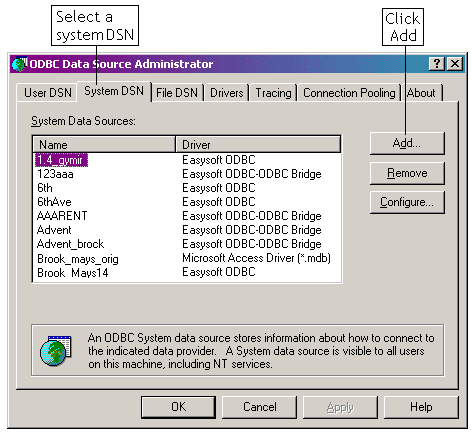
1. Select Start > Settings > Control Panel, double-click Administrative Tools and then Data Sources (ODBC).
|
Select Start > Settings > Control Paneland double-click ODBC Data Sources (32bit). |
|
Select Start > Settings > Control Paneland double-click Data Sources (ODBC). |
The ODBC Data Source Administrator dialog box is displayed.
2. Select the System DSN tab and click Add:
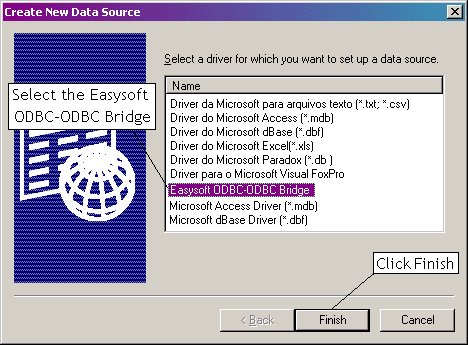
3. Select Easysoft ODBC-ODBC Bridge from the list of drivers and click Finish:
4. Fill in your details using this outline and click Test:

Click Test to display a dialog box with details of the connection that has been made:
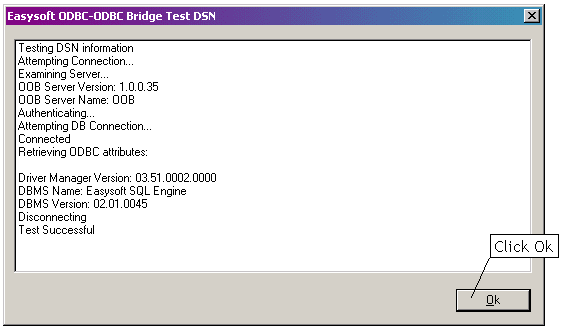
5. Once you have a successful test connection, select OK all the way out of the Data Source Administrator to save the data source.
Connecting to a data source
The Easysoft Administrator now needs to be loaded up in order to allow file definitions to be entered into the blank schema files.
For this you will need to understand the layout of your ISAM files.
The key parameters in the layout of the file are:
By mapping these attributes into the schema files, the ISAM files can be manipulated relationally.
1. Select Start > Programs > Easysoft > Easysoft Administrator > Catalog Administrator to load the Easysoft Administrator.
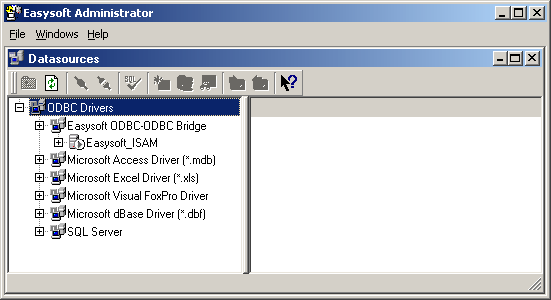
A list of all the ODBC drivers for which ODBC data sources have been created on this machine is displayed on the left-hand side of the Datasources window.
2. Either click on the + symbol next to Easysoft ODBC-ODBC Bridge or double-click on Easysoft ODBC-ODBC Bridge to display a list of its associated System and User DSNs:
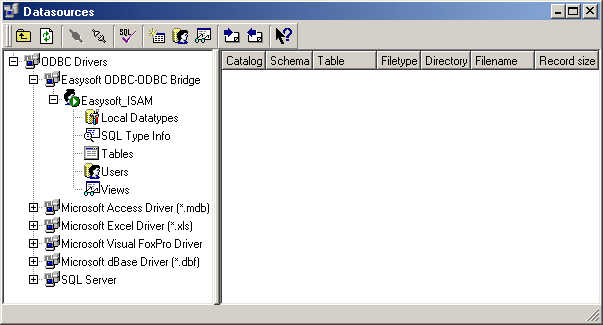
3. Open the Easysoft_ISAM data source by either clicking on the + symbol next to Easysoft_ISAM or double-clicking on Easysoft_ISAMitself:
Creating a new table
Before a new file definition is entered, a table that will reference the file needs to be created.
Within the Easysoft Administrator software you map the definition straight onto tables, rather than defining the file and then having to create a separate table definition.
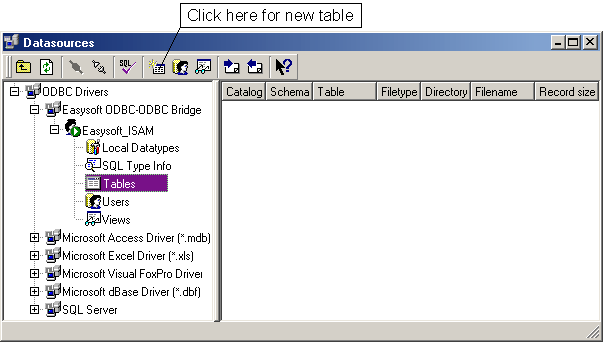
In this example the ORDERS file from the Easysoft sample database will be used to create a new schema table:
1. Click the New Table toolbar button at the top of the Administrator (or alternatively right click on the tables icon and select New Table):
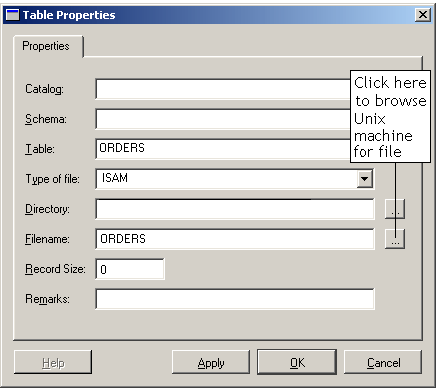
The Table Properties dialog box is displayed, which requires you to input details of the location and name of the file you wish to map.
2. Substitute your own file for the example ORDERS file:
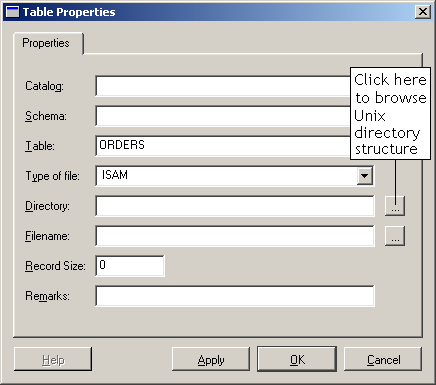
3. Click on the browse button to the right of the Directory field to browse to the directory where your ISAM file is located on your Unix server:
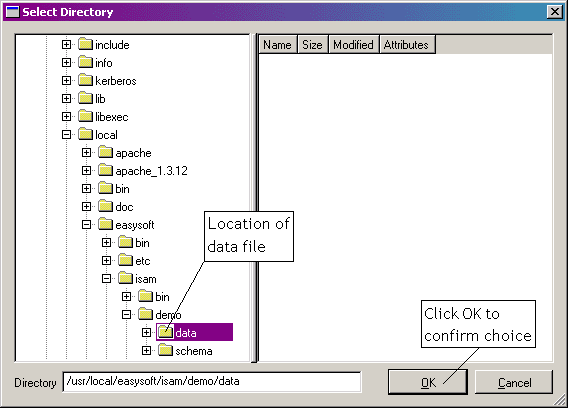
4. The directory where the file is located will then be displayed in the Table Properties dialog box.
5. You will then need to select the file that your table will reference:
6. From the Unix directory structure select the .dat data file that you want to define:
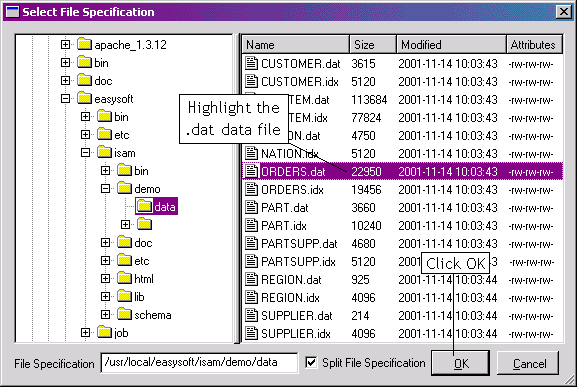
7. Select the Split File Specification check box to list the directory location and file name separately in the Table Properties dialog box.
The Update Record Size dialog box displays information regarding the record length of your file:
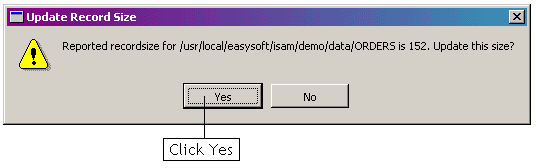
The reported record length of the file will be inserted into the Record Size field on the Table Propertiesdialog box if you click Yes.
However, if you believe the reported record size is incorrect you may enter an alternative value manually if you click No.
Once all the details have been entered the Table Properties dialog box will look like this:
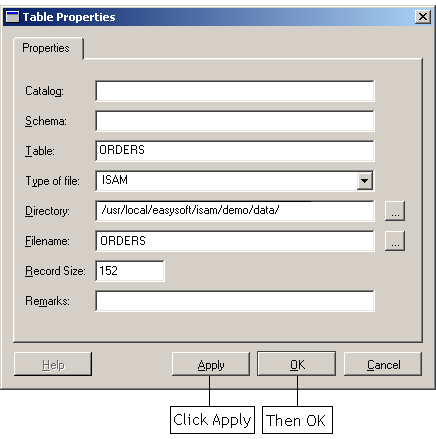
9. Click Apply and then OK, and the table definition will be saved into the schema files on the Unix server.
The column attribute details can now be entered.
Entering column attributes
Having created a table definition, it is necessary to create a file definition.
For the ORDERS file the definition could look something like this:
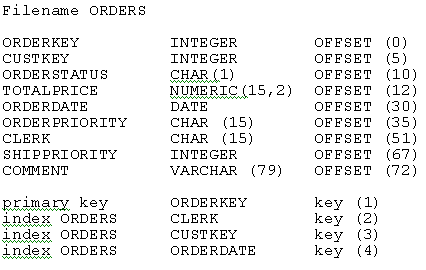
File definitions can take many forms and are often incorporated into the source code that created the files in the first place, but they need to contain three pieces of information about the field structure of the file to enable you to map these definitions into the Easysoft schema:
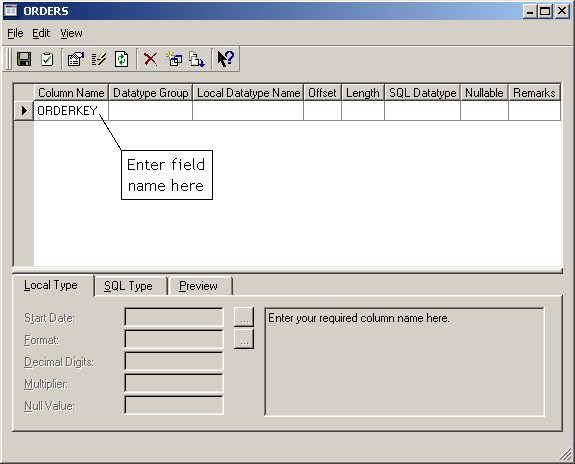
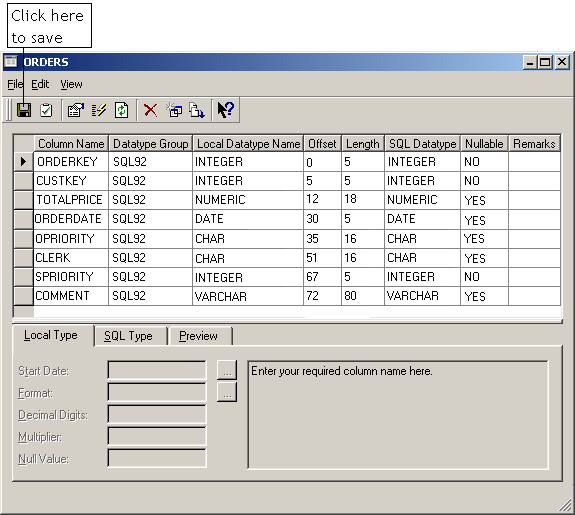
A blank grid for the entry of field details (in this case for the ORDERS file) is displayed:
1. Enter the field name of the file into the Column Name field:
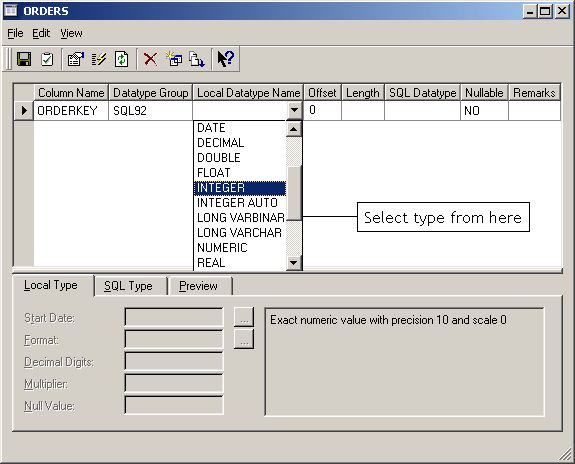
2. Select a data type from the Datatype Group drop-down list:
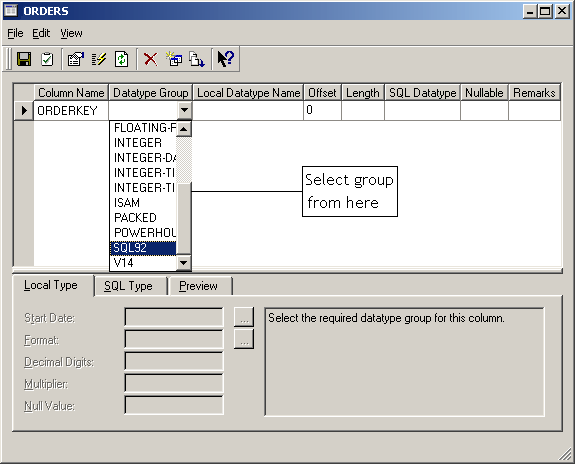
The data type group you will need to select depends on the way in which the data is stored on your server.
The groups are based upon the different types of data storage that Easysoft have encountered on the servers of various customers.
The ORDERS file that is being mapped here as an example was created using SQL92 standard data types on the server, so this should be selected as the data type group.
Depending on the data storage at the file level (which should be known from a file definition) there should be a grouping that contains the data type you require.
The ORDERKEY field is known to be stored as an INTEGER on the server with a length of 5, as the next field has an offset of 5, and the SQL92 integer has a fixed length of 5 (see Figure 41 on).
Therefore the INTEGER data type can be selected from the Local Datatype Name drop-down list, as it seems to fit with the server data type:
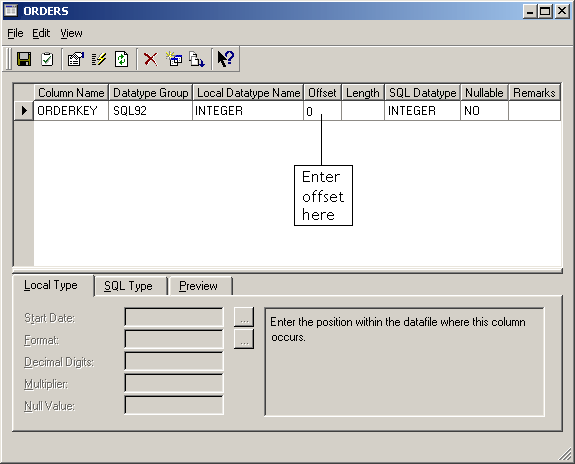
3. Enter a numeric value into the Offset field.
For the first field the column will be at Offset 0 (the beginning of the record):
As the INTEGER data type has a fixed length of 5, this value must be used for the Length field. Any other entries (and this is valid for all fixed length data types) will result in an error when the table is validated.
See Saving a table and generating indexes for further information on table validation.
4. Enter a numeric value into the Length field:
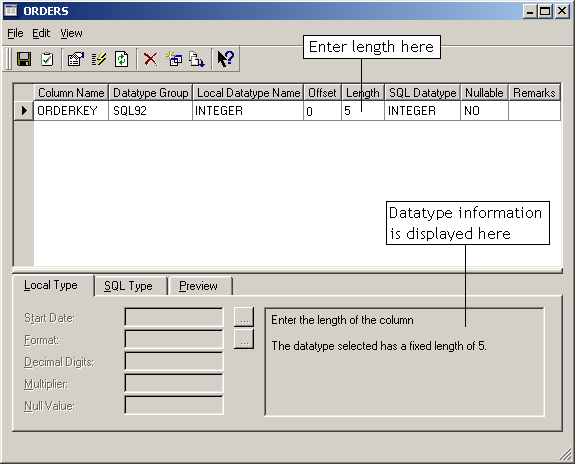
Once the length field has been entered, the SQL Datatype field will be added automatically to complete the row.
5. Tab down to the next row of the table and repeat this process for the rest of the file which is to be defined.
|
During the process to add in the rest of the columns note that Offset values will be generated automatically. These can be manually amended to allow file mapping in an order other than by offset. |
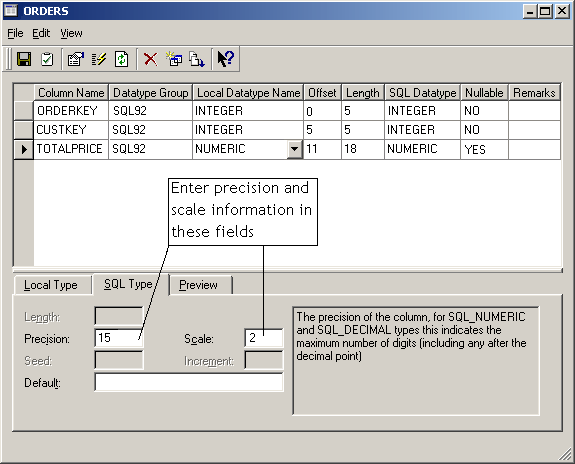
Defining Numeric Fields with Decimal Places
Precision and scale can be defined in a field with implied decimal places within the SQL Datatype field. For example, the TOTALPRICE field in the ORDERS table is described as:
TOTALPRICE NUMERIC(15,2) OFFSET (12)
indicating that this field has a precision (maximum number of digits) of 15 and that two of those digits are stored after the decimal point.
This would be configured by entering "15" into the Precision field and "2" into the Scale field:
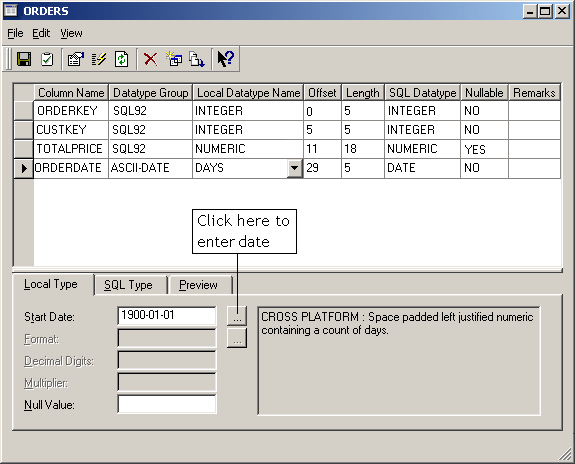
Defining Date Fields
Date fields within Easysoft are extremely flexible and reflect the many different ways in which dates can be stored.
The data type used in the ORDERS example has a fixed format date data type.
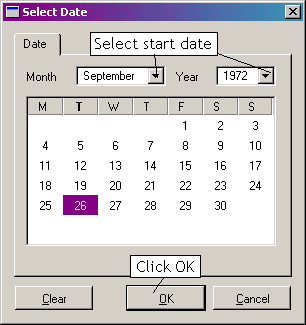
However, fields containing Julian date formats, for example, contain a count of a number of days from a specific start date, which can be entered into the Start Datefield:
Select the required day, month and year:
Saving a table and generating indexes
1. Once the file has been completely mapped, the table definition must be saved into the schema files:
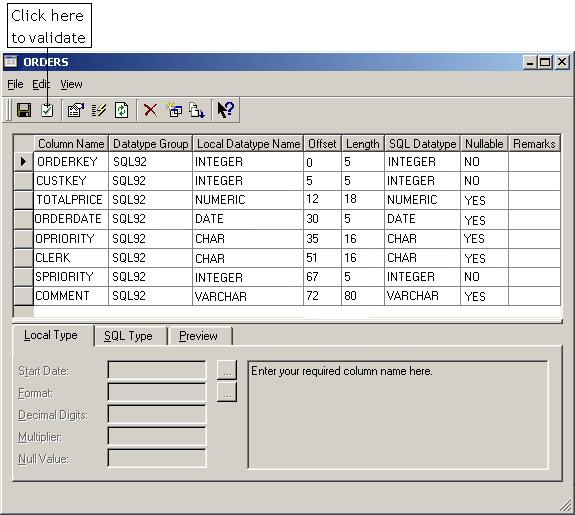
The table will now be validated to make sure that the definitions entered are valid and that they can be parsed without error into the schema files.
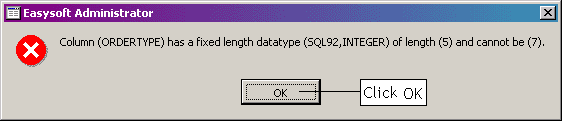
You may receive error messages informing you that amendments are necessary, such as:
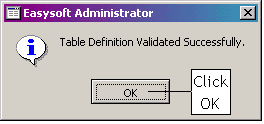
Otherwise you will receive a message informing you that the table definition layout is valid:
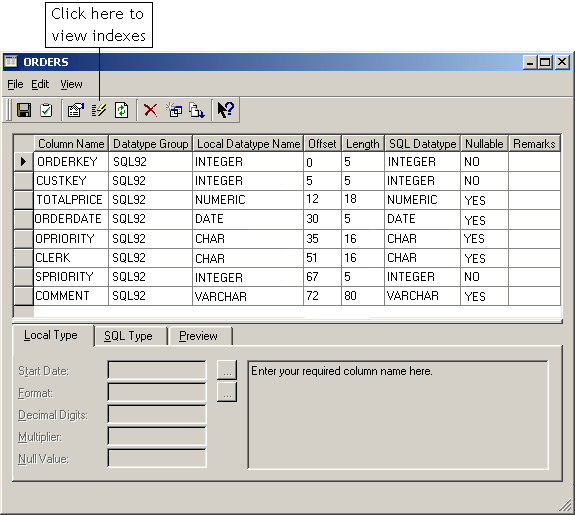
2. Once the table has been validated, save the definitions:
Usually the software will include all keys set on a file into the new definition.
However, it is always best to check that all indexes are present, as if they are missing performance can be impaired.
3. Enter the Index Properties dialog box by clicking on the indexes icon:
The Index Properties dialog box displays the key information from which indexes will be generated:
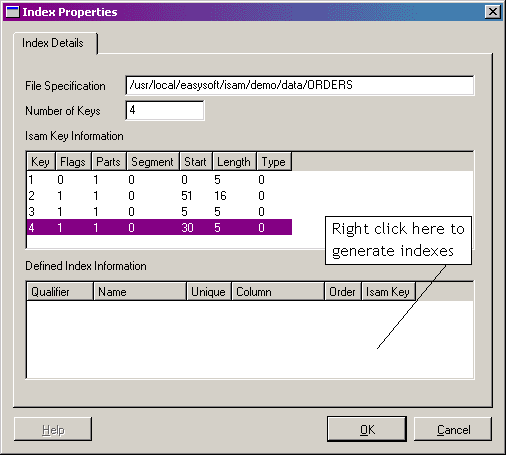
New indexes cannot be generated at this stage, but the existing indexes that have been read from the .idx file can be manipulated.
4. View the existing indexes by positioning your mouse pointer over the Defined Index Information dialog box and right clicking.
The indexes are read from the file that you are defining:
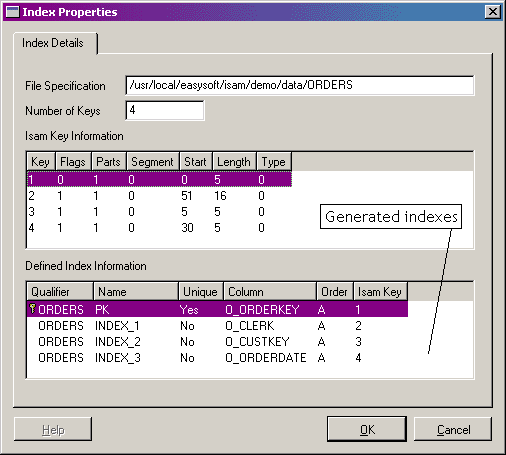
6. Once the indexes have been generated, click OK to return to the main Administrator window.
7. Click Close to validate and save the table definition and then exit.
8. Display the new table by clicking Refresh:
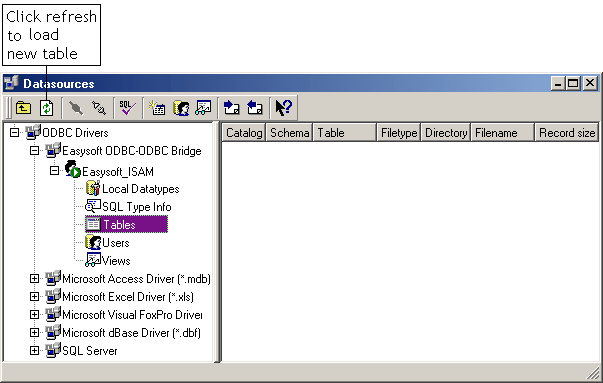
The table will be displayed beside the tables icon:

The table is now ready to be linked into any ODBC compliant application.