Easysoft Administrator User Guide - Administration
Using the Easysoft Administrator
This section describes how to map your unique ISAM data source schema so that your data can be accessed by Easysoft products.
Chapter Guide
- Starting the Easysoft Administrator
- Connecting to a data source
- Local Data Types
- SQL Data Types
- Tables
- Users
- Views
- Importing and Exporting
Starting the Easysoft Administrator
The Easysoft Administrator is started as follows:
Select Start > Programs > Easysoft > Easysoft Administrator > Catalog Administrator.
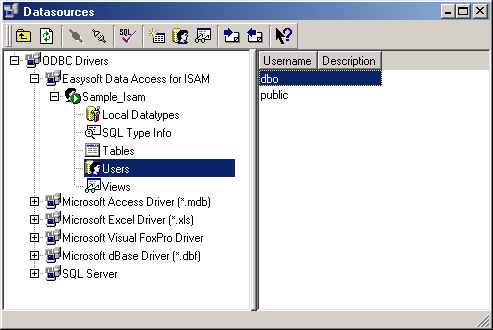
The Datasources window is displayed:
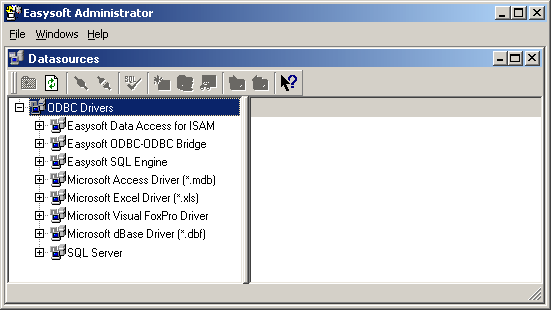
A list of all the ODBC drivers for which ODBC data sources have been created on this machine is displayed on the left-hand side of the program window.
Either click on the + symbol next to the driver name or double-click the driver name itself to display a list of System and User DSNs for a driver.
System data sources are displayed with icons picturing a machine alongside the data source name.

User data sources are displayed with icons picturing a head alongside the data source name.

Notice that the data sources are displayed with an icon showing a green arrow on a white background, to signify that a connection has not yet been made to them.
Connecting to a data source
Data source details can be displayed by either:
- clicking on the + symbol next to the data source name
- double-clicking on the data source name itself
-
highlighting the required data source name and selecting the Connect icon on the Toolbar.

You can also highlight any data source name and select the Disconnect icon at any time to end your session.

You will see entries displayed for:
If a connection succeeds then the data source is displayed with an icon showing a white arrow on a green background.

If a connection fails then the user wil receive an error message in a dialog box and the data source will be displayed with an icon showing a white cross on a red background.

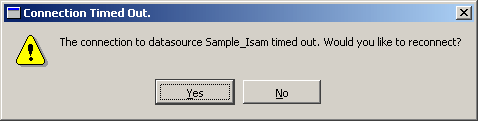
If you connect to a data source and then do not access it for a period of time then the connection will automatically be dropped and you will be asked if you wish to reconnect:
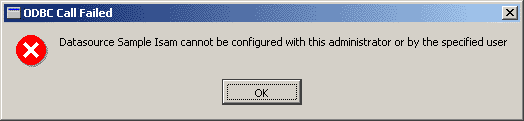
Note that if the Target User with which a data source has been configured via the Data Source Administrator on the client is not dbo, then an error message similar to the following will be displayed when a user tries to connect from that client machine:
Local Data Types
A list of valid data types may be viewed by clicking on Local Datatypes:
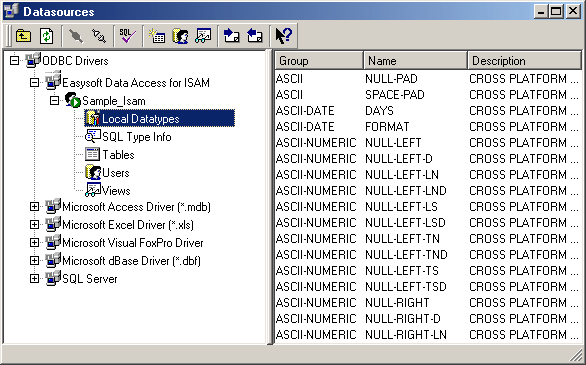
Various data type groups are defined, along with a list of data types available within them, their description, SLQ group and SQL type:
|
The V14 data type group is for the deprecated Easysoft ISAM for ODBC product, for which an Import utility exists (see Importing and Exporting). |
Local Data Types cannot be added to or amended within the current version of the Easysoft Administrator.
SQL Data Types
A list of valid SQL data types may be viewed by clicking on SQL Type Info:
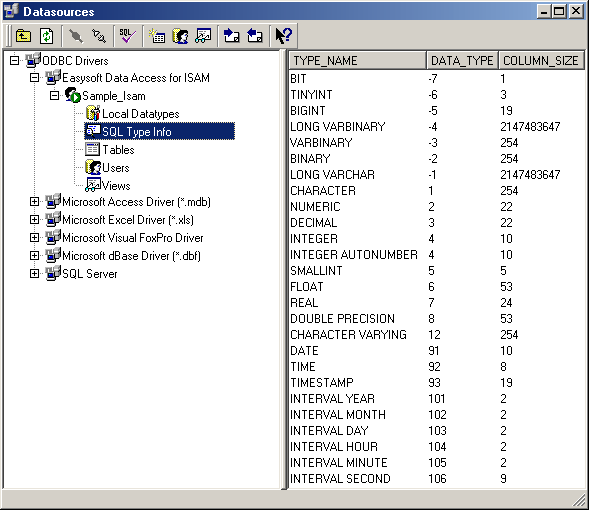
SQL Types cannot be added to or amended within the current version of the Easysoft Administrator.
Tables
Creating Tables
A new table may be created either by selecting the New Table icon on the Datasources window or by right-clicking on Tables and selecting New Table from the pop-up menu.

This displays the Table Properties dialog box:
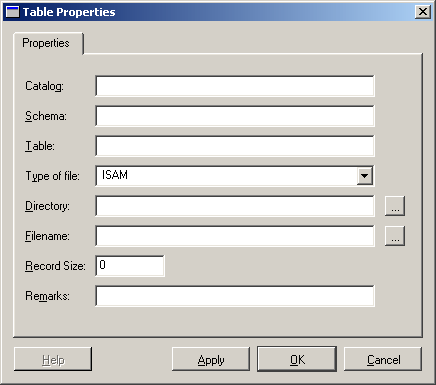
The following fields are displayed and require details to be entered:
- Catalog: enter any catalog name incorporated into the data source.
- Schema: enter any schema name incorporated into the data source.
- Table: enter a logical name for the table. This field is mandatory.
- Type of file: select the file type to be ISAM or sequential.
- Directory: enter the directory within the operating system where the table is located.
Specifying this field allows an ISAM file to be located in a directory other than the default schema directory, which will be searched either after the specific location, or directly if the field is left blank. A browse button allows a graphical search for the directory name required via the Select Directory dialog box.
- Filename: enter the physical filename of the table within the operating system without its extension.
This field is case-sensitive on Unix systems and is mandatory. A browse button allows a graphical search for the filename required via the Select File Specification window. If the Split File Specification tick box on that window is selected then the filename will be placed into the Filename field and the file path into the Directory field on the Table Properties window. Otherwise, the full path and filename will be placed into the Table Properties window Filename field.
- Record Size: enter the total record size of the table.
- Remarks: enter any relevant extra information about the table.
Click the Apply button to accept the new details and enter information for another new table if required. When all new table data has been input then click the OK button to finish. Click the Cancel button to reject the input.
The newly created table (or tables) will be displayed in the list of tables in the right-hand pane of the Datasources window.
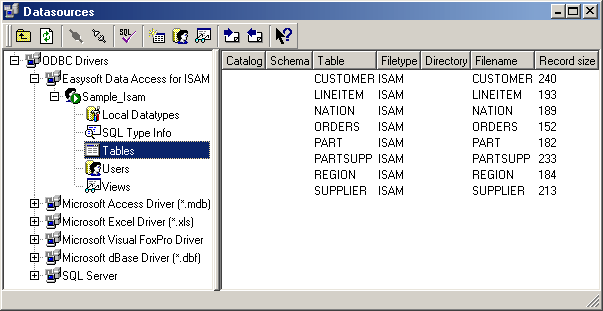
Displaying Tables
Clicking on Tables within the Datasources window will display a list of tables for that data source:
Highlighting and then either double-clicking on a row on the right-hand side of the program window or right-clicking and selecting Edit will display a window showing details of the selected table, the logical name of which will be displayed on the title bar.
A sample file definition shows information for the CUSTOMER table from the sample database:
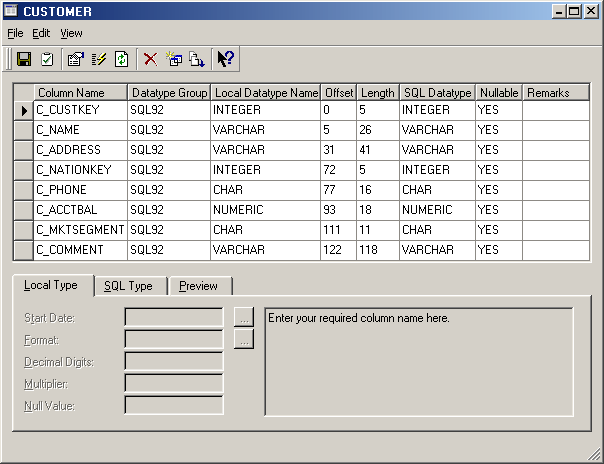
The window contains the following columns, all of which can be amended by clicking onto them and either overtyping or selecting an item from a drop-down list:
- Column Name: displays and allows you to rename a data source column.
- Datatype Group: clicking on the field displays and allows you to select a data type group name from a drop-down list.
The list of groups in the drop-down list corresponds to the data type information held within the data source schema. Within each of these groups are subset of local data types, as displayed in the Local Datatype Name column.
- Local Datatype Name: clicking on the field displays and allows you to select a local data type name from a drop-down list.
The list of names in the drop-down list corresponds to the data type information held within the data source schema and the selected Datatype Group.
- Offset: displays and allows you to renumber the offset of the selected data source column.
- Length: displays and allows you to renumber the length of the selected data source column.
- SQL Datatype: clicking on the field displays and allows you to select an SQL data type from a drop-down list.
The list of SQL data types in the drop-down list corresponds to the selected Datatype Group and Local Datatype Name fields.
- Nullable: enter "YES" if null values are allowed.
- Remarks: displays and allows you to enter any relevant additional information.
Selecting a table row and then right-clicking on a table name also displays the following options in addition to Edit on a pop-up menu:
- New Table: displays the Table Properties window for the entry of Catalog, Schema, Table, Type of file, Directory, Filename, Record Size and Remarks fields.
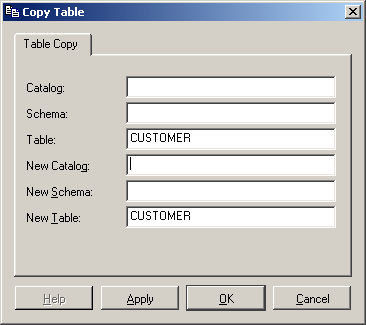
- Copy: displays the Copy Table dialog box with the Table and New Table fields preselected with the current catalog, schema and table names.
You are then able to enter the details of the new table you require:
- Delete: displays a dialog box asking you whether you are sure you wish to delete the selected table.
- Settings: displays two system attributes in the Table Settings dialog box:
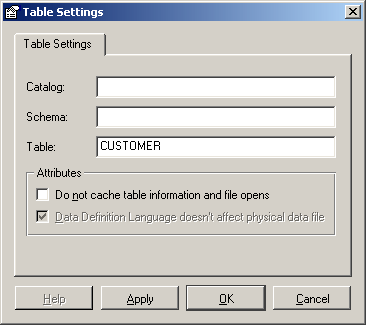
Please do not amend these settings without contacting Easysoft support:
Right-clicking anywhere on the grid in the file definition window displays the following options on a pop-up menu:
- Insert New Column: opens up a new row on the grid (as signified by a marker against the Column Name) in which to enter field details.
- Delete Column: allows you to delete a row on the grid (as signified by a marker against the Column Name) in which is held field details.
A dialog box is displayed asking whether you are sure you wish to proceed with the deletion.
A dialog box is displayed asking you whether you are sure you wish to proceed.
- Indexes: displays the Index Properties dialog box showing details of any indexes defined for the selected table.
- Properties: displays the Table Properties window showing the properties of the selected table, as shown in Creating Tables.
The Table Details window also displays three Tab folders, two of which contain type information for each column and a third which allows the user to preview the ISAM data against the layout which has been defined.
The Local Type tab folder corresponds to the field selected via the Local Datatype Groupand Local Datatype Name columns, and enables the following attributes which apply to the selected local data type:
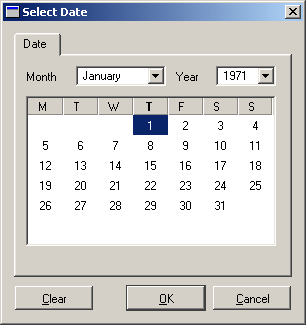
The browse button displays a dialog box in which the required day, month and year can be entered. You cannot type directly into the field itself:
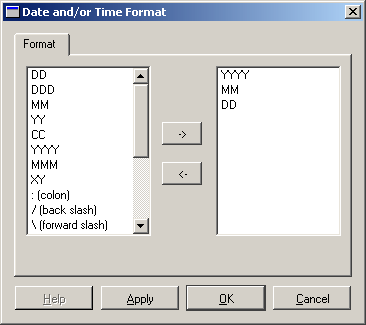
The browse button displays a dialog box in which day, month, year and punctuation symbols can be entered. You cannot type directly into the field itself.
- Decimal Digits: this field enables you to specify the number of decimal places within a numeric field.
- Multiplier: this field enables you to specify the multiplier within a numeric field (i.e. the value stored in the field will be multiplied by ten to the power of this value).
- Null Value: this field enables you to specify the null value for the field.
The SQL Type tab folder corresponds to the field selected via the SQL Datatype column and enables the following attributes which apply to the selected SQL data type:
- Length: this allows you to specify the number of significant leading characters within a character field where this differs from the actual length of the field on the target data source (note that the actual length of the field is displayed in the Precision field, but cannot be amended).
- Precision: this allows you to specify the leading number of significant digits within a numeric field where this differs from the actual length of the field on the target data source.
- Scale: this allows you to specify the number of decimal places within a numeric field to be applied when a value is inserted or queried by an application.
- Seed: this allows you to specify the initial integer start value of an automatically incrementing numeric field.
- Increment: this allows you to specify the integer amount by which an automatically incrementing numeric field increases each time a new instance is inserted.
- Default: this allows you to specify the additional default value in a field when a value is inserted or queried by an application e.g. a salutation (Mr, Ms, Mrs etc.) in a character field or non-zero value in a numeric field.
The Preview tab folder displays each column of the current data table with its specified layout, assuming that the defined layout matches the data source.
This allows you to test whether or not your tables have been correctly defined.
Either right-clicking anywhere on the grid of table details and selecting Properties or selecting the Properties toolbar button will display the Table Properties window showing the properties of the selected table, as shown in Creating Tables.

Either right-clicking anywhere on the grid of table details and selecting Indexes or selecting the Indexes toolbar button will display the Index Properties dialog box showing details of any indexes defined for the selected table:

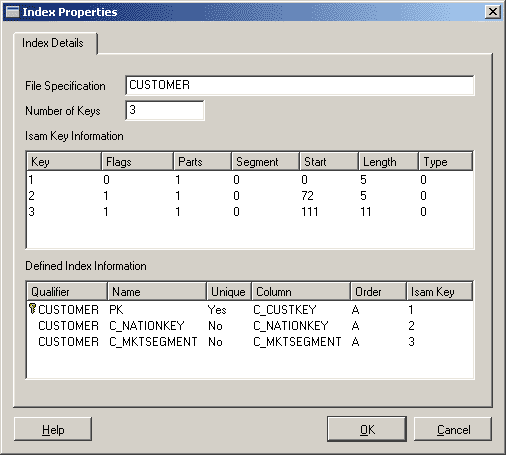
The ISAM Key Information data is built by the Administrator each time the window is invoked.
However, the Defined Index Information data must be generated by entered by right-clicking on the Defined Index Information pane and selecting Generate Indexes.
Once generated, these indexes may then be removed, regenerated or moved up and down in their priority by right-clicking and selecting the appropriate menu item.
It is not mandatory to define generated indexes, as the Easysoft software will still read an ISAM data file, as long as its fields have been correctly defined.
There may well be a valid reason not to specify any indexes, although there will almost certainly be a degradation in performance.
Note that the index which is specified as the primary key is signified by a key icon.

Users
Creating Users
A new user may be created either by selecting the New User icon on the Datasources window or by right-clicking on Users and selecting New User from the pop-up menu.

The User Details - New dialog box is displayed:

The following fields are displayed and require details to be entered:
- User Name: enter a unique name for the user.
- Password: enter a unique password that the user must enter when they log on.
- Description: enter a general description of the user.
Click the Apply button to accept the new details and re-enter information for another new user if required.
When all new user data has been entered, click the OK button to finish and accept the input or click the Cancel button to reject the input.
The newly created user (or users) will be displayed in the list of users in the right-hand pane of the Datasources window.
Displaying Users
Clicking on Users from within the Datasources window will display a list of users for that data source:
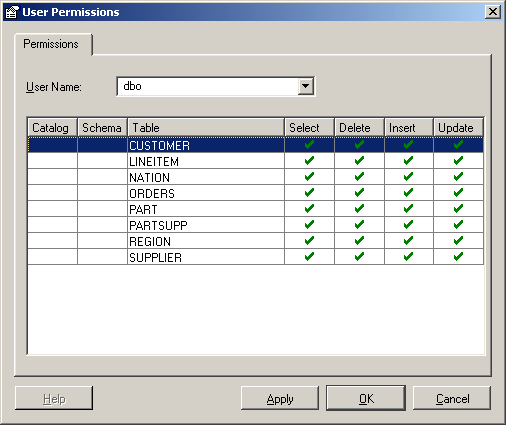
Highlighting and then either double-clicking on a row on the right-hand side of the program window or right-clicking and selecting Permissions from the pop-up menu displays a User Permissions window.
This defaults to the current user and displays Select, Delete, Insert and Update permission details for each table in the data source for that user.
By selecting from the User Name drop-down list the details for all other users can also be displayed and updated:
Selecting and then right-clicking on a user name also displays the following options in addition to Permissions on the pop-up menu:
- New User: displays the User Details window for the entry of User Name, Password and Description fields.
- Edit: displays the User Details window for the entry of Password and Description fields.
- Copy: displays the User Details window for the entry of a New User field.
- Delete: displays a dialog box asking you whether you are sure you wish to delete the selected user.
- Rename: displays the User Details window for the entry of a New User field.
The availability of these options varies depending on the nature of the selected user:
- dbo: this user name is hard-coded and cannot be deleted or renamed. This is because, as database owner, this is a unique top level user with full rights and permissions over all other users. You are allowed to amend the dbo user password, description or table permissions and also to create a new user with the dbo table permissions attached.
- public: this user name is hard-coded and cannot be edited, copied, deleted or renamed. This is because, as a public user, it is effectively a unique group identifier and is subject only to amendments to its table permissions.
- others: this category refers to any users created other than dbo and public. There are no restrictions on the properties of these users.
Views
Creating Views
A new view may be created either by selecting the New View icon on the Datasources window or by right-clicking on Views and selecting New View from the pop-up menu.

This displays the View Properties dialog box:
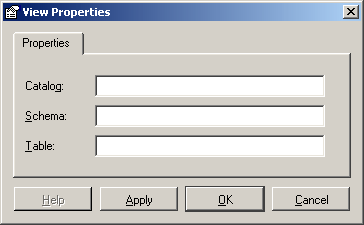
The following fields are displayed and require details to be entered:
- Catalog: enter any catalog name incorporated into the data source.
- Schema: enter any schema name incorporated into the data source.
- Table: enter a logical name for the table. This field is mandatory.
Click the Apply button to accept the new details and re-enter information for another new view if required.
When all new user view has been entered, click the OK button to finish and accept the input or click the Cancel button to reject the input.
The newly created view (or views) will be displayed in the list of views in the right-hand pane of the Datasources window.
Displaying Views
Clicking on Views from within the Datasources window will display a list of views for that data source:
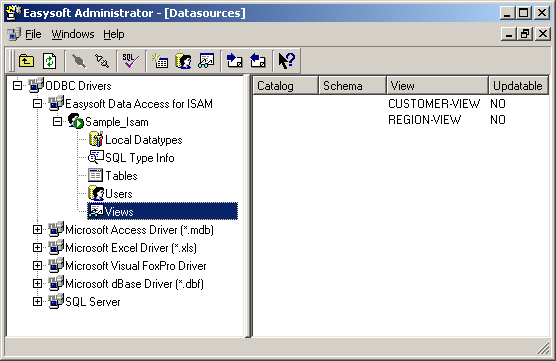
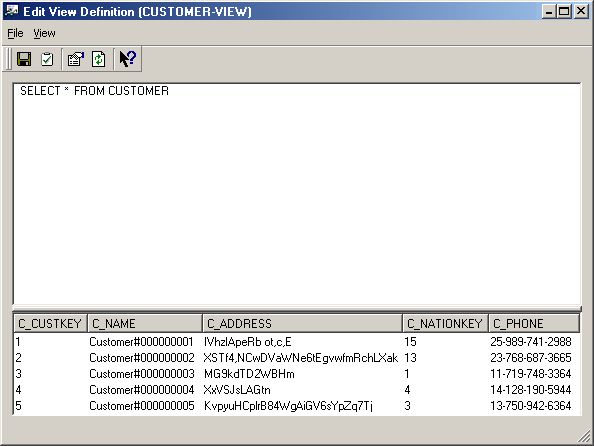
Highlighting and then either double-clicking on a row on the right-hand side of the program window or right-clicking and selecting Edit from the pop-up menu displays a Edit View Definition window.
At this point you can type any SQL statement into the top window, combining tables and fields as you require.
select * from CUSTOMER where C_ADDRESS like 'X%';
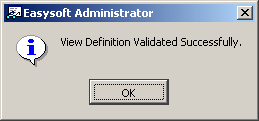
To validate and run your view, you can either select the Validate icon on the Edit View Definition window or select File > Validate from the Edit View Definition window menu.

A successful SQL statement will display the following message:
An invalid SQL statement will result in an "ODBC Call Failed" message in this format:
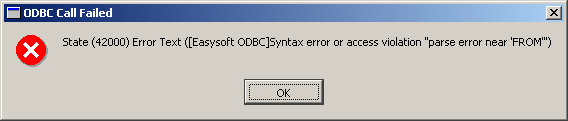
There are many different possible errors that could arise in your SQL statement, but reading the error message carefully should allow you to work out which part of the clause is causing the problem.
Importing and Exporting
Export
By selecting the Export button you can write SQL to a flat text file containing privilege, table and user schema definitions of the currently accessed data source. Once generated, this SQL may then be used to input into a different blank data source using the Import utility (see Import).

You are guided through this process by three Easysoft Export Definition Wizard screens which will ask you what export format, filename and schema definitions you require.
Import
By selecting the Import button you can import generated privilege, table and user schema definitions of a selected data source into the currently accessed data source.

You are guided through this process by two Easysoft Import Definition Wizard screens which will ask you what import format, catalog name and schema definitions you require.