Data Access for ISAM User Manual - Administration
Using the Easysoft Web Administrator
This section describes how to create and grant user access permissions to your data using the Easysoft Web Administrator provided with Easysoft Data Access for ISAM.
Chapter Guide
- Introduction
- Starting the Web Administrator
- Logging on to the Web Administrator
- Adding users
- Modifying and removing users
- Specifying user access rights
Introduction
The Web Administrator utility allows you to limit the access that people have to your data by creating users for a data source and specifying their access rights to the data within that data source.
This allows individual users to be prevented from editing, deleting or viewing certain files.
Starting the Web Administrator
To run the Web Administrator it is necessary to start the Web Administrator server and then connect to it from a web browser.
Follow the instructions in the appropriate platform box to start the server:
|
1. Log onto your machine as root. 2. Change into the <InstallDir>/easysoft/isam/bin directory. Accept the default port (8451) or specify another unused port. |
Run a Web browser on the machine from where you want to manage your users, and go to http://server:8451 (where server is the name or IP address of the machine on which Easysoft Data Access for ISAM is installed and 8451 is the port at which the Web Administrator is listening).
For example, if the Web Adminstrator is running on the local machine, type:
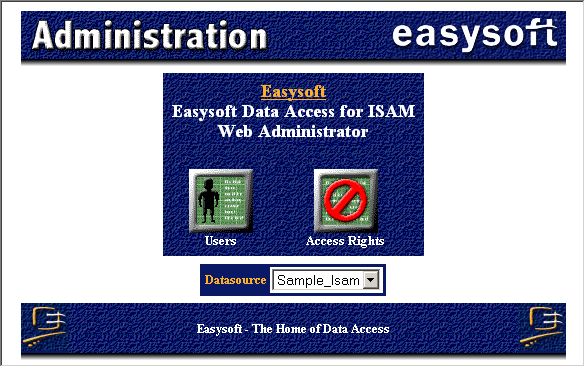
The main screen of the Web Administrator displays a list of the data sources which have been configured for use with Easysoft Data Access for ISAM:
|
During installation, if you did not specify the file locations needed to link to your ISAM data, and you have not specified them since, any attempt to work with a ISAM data source will produce an error. See "odbc.ini settings for Unix" for details of the attributes you need to set to configure the data source. |
If you ever need to stop the Web Administrator:
- Windows users should close the DOS window in which the server is running.
- Unix users should log on as root, change into the <InstallDir>/easysoft/isam/bin directory and run ./stop_http.sh.
The Web Administrator should only ever need to be restarted if the server fails or if it is to be run from another port.
Logging on to the Web Administrator
To create users and specify their rights, you must log on to the Web Administrator as the top level user (known as the database owner) and enter the password for that user.
You are required to log on when you click Users or Access Rights for the first time in a Web Administrator session, and again if you select a different data source or change the password of the database owner.
When asked to log on for the first time, enter a user name of dboand password of easysoft, but once logged on, the password of the database owner must be changed immediately:
1. Click Users to display a list of users.
Only the dbo user is set up by default.
2. Enter a new dbo password in the Password box and the old dbo password in the Old Password box.
The old password must be entered for the new password to take effect.
3. Click Submit to save the new dbo password.
Adding users explains how to add other users so that their access to the ISAM data can be restricted.
|
The database owner sees all tables that contain ISAM data within the Web Administrator. |
Adding users
1. Log in to the Web Administrator, as described in Logging on to the Web Administrator.
You must log on as the dbo user if you have not already done so.
3. Select the data source for which you want to create users.
Any users already set up for this data source are listed on the page. The last row in the list of users is blank, which is where the details are entered to add a new user.
|
Click Refresh whenever you select a different data source to ensure that you are viewing the correct list of users for that data source. |
4. To add a user, type a name in the empty User box.
5. Enter a description for the user if required (this is not mandatory).
6. Enter a password for the user if you require additional security for the selected data source (this is not mandatory).
7. Click Submit to create the user.

By default, new users do not have access to any tables in the selected data source.
To find out how to enable privileges for a user, see Specifying user access rights.
When a user has been enabled, they must be informed of their user name and password (if any), because these fields must be entered when a user data source is configured to connect to the ISAM data.
|
Users must be given their user name and password in the correct case, as these details are case sensitive. |
Where the user enters these details depends on how they are connecting to the data, as the user name and password may be entered either as part of the data source configuration during set up or via an application dialog box at run time.
- when connecting to local data on a Windows NT machine, enter these details on the Easysoft Data Access for ISAM DSN dialog box.
- when connecting to local data on a Unix machine, enter these details in the appropriate DSN section of odbc.ini.
- when using an Easysoft ODBC-ODBC Bridge client on Windows NT to connect to data on a Unix server, enter these details on the Easysoft ODBC-ODBC Bridge DSN dialog box that they complete to connect to the data source.
If log on details are not specified in the data source, then the user name and password should be requested as part of the application, but note that this is not necessarily the case and some applications may not run correctly.
Modifying and removing users
You can change a user's password, and you can delete users to permanently remove their access to the ISAM data.
1. Log in to the Web Administrator as described in Logging on to the Web Administrator.
3. Select the data source whose users you want to modify or delete and then click Refresh to ensure that you are viewing the users for that data source.
4. Edit the details in the Password box for the appropriate user and then click Submit to confirm your changes.
5. To delete a user, click the Delete box for that user (the box contains an X when it is selected) and then click Submit.
The user is removed from the list on this page.
Specifying user access rights
Once a user has been created for a data source, you can choose the data source tables to which that user has access and whether they have select, insert, update or delete access to each table.
To grant a user access to specific data source tables:
1. Log in to the Web Administrator as described in Logging on to the Web Administrator.
3. Choose the data source for which you are granting access and then click Refresh to ensure that the correct list of users is displayed.
4. Choose the user for whom you want to grant access.
Choose the public user to specify the same rights for all users and the click Refresh to ensure that the correct permissions are displayed for this user.
All the tables in the selected data source are listed, and the current user's rights to those tables are shown.
5. To grant the user all rights to all tables, click Grant All.
6. To remove all the rights of a user to all tables, click Revoke All.
7. To grant specific rights to specific tables, select or deselect the appropriate boxes and click Submit Selection to apply the changes.
For example, to give a user read-only access to all tables in a data source:
- click Revoke All to remove all the rights of that user
- click the Select box for each table (these boxes contain an "X" when selected)
- apply the changes by clicking Submit Selection
In Figure 27, the access rights for user test are:
- SELECT access for all eight tables in the data source
- INSERT access to the LINEITEM table
- UPDATE and DELETE access to the PART table
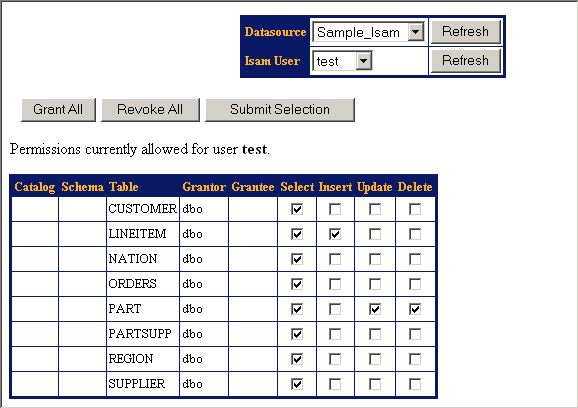
Note that the permissions table also shows any Catalog or Schema details in the two left-hand columns for each table that is displayed.
Additional columns show Grantor and Grantee information relating to the table permissions that have been allocated.