Accessing ODBC data sources from Forte for Java
Contents
Adding the Easysoft JDBC-ODBC Bridge client to Forte
Install the JDBC-ODBC Bridge server on the machine where your ODBC data sources are located. This will typically be a different machine to the Forte for Java one.
Copy the Easysoft JDBC-ODBC Bridge client (EJOB.jar) to the Forte for Java lib/ext directory before you start Forte for Java. You can't mount the client in Forte Explorer to start Forte for Java, or add the client to the system CLASSPATH.
To add the Easysoft JDBC-ODBC Bridge client:
- Choose File>Explorer and then choose the Runtime tab:
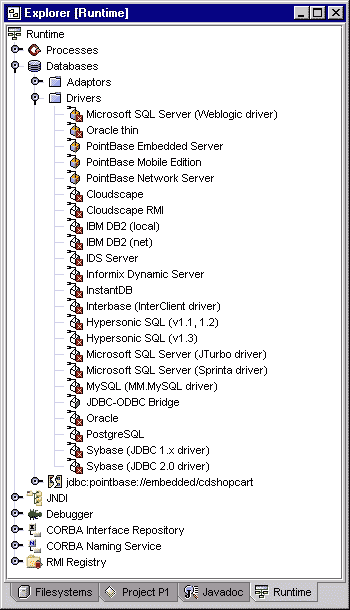
- Right-click on Drivers.
Note You need to install the NetBeans Database Explorer module to add the Runtime > Databases > Drivers tab.
- Choose Add driver.
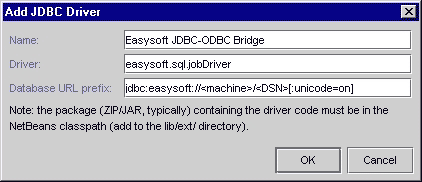
The Add JDBC Driver dialog box is displayed, enabling a new driver to be added.
Complete the dialog box fields:
Field Description Entry Name The IDE uses this name for display purposes only. Easysoft JDBC-ODBC BridgeDriver The fully qualified driver class name. easysoft.sql.jobDriverDatabase URL prefix A JDBC URL template for the JDBC-ODBC Bridge. jdbc:easysoft://machine/DSN[:unicode=on]The Database URL prefix template field can represent an invalid URL, the correct value for which can be completed later when a connection is made. For additional attribute value pairs, refer to the Getting Started Guide.
- Choose OK to add the new driver to the list:
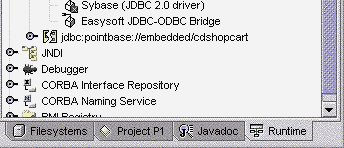
Easysoft JDBC-ODBC Bridge should appear in the list of drivers.
- Drivers can be removed manually by selecting them in Forte Explorer and choosing Delete. You can open the driver's property sheet and modify its configuration.
Note that adding a new driver just creates a template for new connections. Forte for Java does not actually try to use that driver or check to make sure it's working until a connection is made using the driver.
To test a driver:
- Right-click on the driver or connection in Forte Explorer and choose Test Driver from the context menu.
- Enter the connection information (database URL, user name, and password) when prompted and choose OK.
- If you get "unsupported exception," test to make sure that the data displayed in the output window is valid. (For example, that the number of tables or columns in the table corresponds with the actual data.) Forte returns "Internal test driver failed" message whenever it finds a return value of 0 or an exception. If your database is empty or a table has no foreign references, the driver might not be the problem.
Connecting to an ODBC data source
There are two ways to open the New Database Connection dialog box, which allows Forte for Java to be connected to a database:
- In the pop-up menu for Databases or for any existing connection, choose Add connection.
- In the pop-up menu for a driver, choose Connect using... to preselect the driver.
Then enter the following:
- The correct driver name in Driver.
- The JDBC URL for the database connection in Database URL.
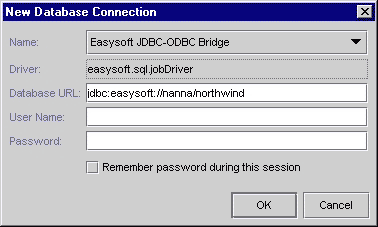
This URL typically begins with
jdbc:, followed by a short code name for the driver, followed by another colon.The rest of the URL depends on the type of driver you are using.
Full details of the JDBC URL for the Easysoft JDBC-ODBC Bridge driver can be found in the Getting Started Guide.
- A User Name and Password if required by your database configuration.
Choose Remember password during this session to have the IDE remember your password.
Note The password is only saved only for the current Forte for Java session. After restarting Forte for Java, the password must be entered again. This feature can be turned on or off in the properties for each connected database in the Explorer.
- Choose OK to connect Forte for Java to the database.
- If the connection is successful, a new node appears on the same level as Drivers. The icon for a connected database shows complete:
If the connection attempt fails, Forte for Java displays a dialog box indicating the connection is broken.
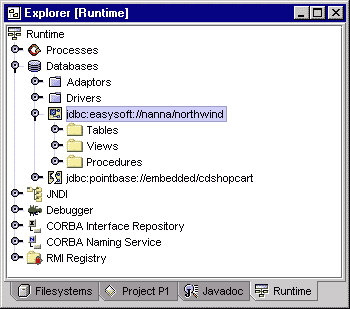
- By expanding the nodes underneath the new database connection, you can access nodes for tables, views, and procedures:
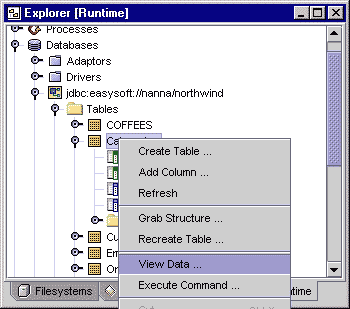
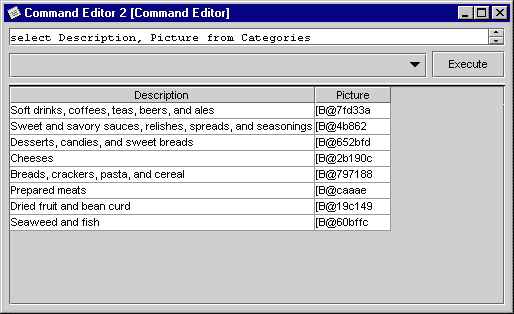
- Right-click to choose View Data from the pop-up menu displays the result of a query showing the data in the table:
To correct the connection:
- Correct the URL in the property sheet.
- Connect to the database by choosing Connect from the pop-up menu.
To disconnect from the database connection:
- Choose Disconnect from the pop-up menu. You cannot browse the database until you reconnect to the database using Connect.