Integrating Salesforce.com with Excel, SQL Server and QuickBooks
Contents
- Overview
- Example: Incremental Data Push from Excel into Salesforce.com
- Example: Incremental Data Pull from Salesforce.com into SQL Server
- Example: Merging Salesforce.com and QuickBooks Data
Overview
This article shows how to pull, push and merge Salesforce data with data stored in other applications.
This data integration process is managed by SQL Server Integration Services (SSIS).
Although SSIS is a SQL Server component, it can extract, transform and load data from other data sources, and provides a graphical user interface for doing this. SSIS packages (where SSIS information is stored, for example, the data source details and transformations to run) are developed in Visual Studio, but can be run on any machine with SQL Server installed, including the free edition, SQL Server Express.
Prerequisite Software
- Microsoft Visual Studio.
- SQL Server Data Tools for Visual Studio.
- SQL Server Express
- The Salesforce.com ODBC Driver.
The Salesforce.com ODBC Driver is available to download from the Easysoft web site:
- Download the Windows Salesforce.com ODBC Driver. (Registration required.)
- Install and license the Salesforce.com ODBC Driver on the machine where SQL Server is installed.
For installation instructions, see the Salesforce.com ODBC Driver documentation.
To work through the Salesforce.com / QuickBooks data merge, the QuickBooks ODBC driver is also required. The QuickBooks ODBC driver is currently in development. To obtain a pre-release version of the driver, contact the Easysoft Sales team ().
Prerequisite Configuration
Configure a Salesforce.com ODBC Data Source
Before you can use the Salesforce.com ODBC Driver to connect SSIS to Salesforce.com, you need to configure an ODBC data source. An ODBC data source stores the connection details for the target database (e.g. Salesforce.com) and the ODBC driver that is required to connect to it (e.g. the Salesforce.com ODBC driver).
You can configure a User ODBC data source, which is only available to the user who creates it, or a System ODBC data source, which is available to all users on the machine. You configure ODBC data sources in ODBC Administrator, which is included with Windows.
64-bit Windows There are two versions of ODBC Administrator on this platform. (If you are not sure whether your version of Windows is 32-bit or 64-bit, follow the instructions in this Microsoft Knowledge Base article to find out.) The version of ODBC Administrator that you need to run depends on whether you have a 32-bit or a 64-bit version of SQL Server. To find out which version of SQL Server you have, connect to your SQL Server instance, and then run this SQL statement:
select SERVERPROPERTY('edition')
If you have the 64-bit version of SQL Server and want to use a linked server with the Salesforce.com ODBC driver, you need to run 64-bit version of ODBC Administrator. To do this, open Administrative Tools in Control Panel, and then open Data Sources (ODBC). (On Windows Server 2003 and earlier, the Control Panel applet that launches ODBC Administrator is labelled Data Sources. On Windows 8 and later, the Control Panel applet is labelled ODBC Data Sources (64-bit).)
If you have the 32-bit version of SQL Server or want to use SSIS with the Salesforce.com ODBC driver, you need to run 32-bit version of ODBC Administrator. To do this, in the Windows Run dialog box, type:
%windir%\syswow64\odbcad32.exe
32-bit Windows To run ODBC Administrator on 32-bit Windows, open Administrative Tools in Control Panel, and then open Data Sources (ODBC). (On older versions of Windows, the Control Panel applet that launches ODBC Administrator is labelled Data Sources.)
Use ODBC Administrator to create your Salesforce.com ODBC Driver data source:
- Do one of the following:
- To create a User data source, in the User DSN tab, choose Add.
–Or–
- To create a System data source, choose the System DSN tab, and then choose Add.
- To create a User data source, in the User DSN tab, choose Add.
- In the Create New Data Source dialog box, choose Easysoft ODBC-Salesforce Driver, and then choose Finish.
- Complete the Easysoft ODBC-Salesforce Driver DSN Setup dialog box:
Setting Value DSN Salesforce.com User Name The name of your Salesforce.com user. For example, myuser@mydomain.com. Password The password for your Salesforce.com user. Token The security token for your Salesforce.com user, if required. To find out whether you need to supply a security token, choose the Test button. If the connection attempt fails with an error which contains
LOGIN_MUST_USE_SECURITY_TOKEN, you need to supply one.Salesforce.com emails the security token to the email address associated with your Salesforce.com user account. If you have not received a security token, you can regenerate it. Salesforce.com will then email the new security token to you. To regenerate your security token, log in to Salesforce.com and then choose Setup from the user menu. Search for "security token" in the Quick Find box. Click Reset Security Token in the Reset Security Token page. When you receive the token in your email client, copy it and then paste it into the Token field.
- Use the Test button to verify that you can successfully connect to Salesforce.com.
Configure a QuickBooks ODBC Data Source
This section is only relevant if you want to work though the Salesforce.com / QuickBooks data merge.
Use ODBC Administrator to create your QuickBooks ODBC Driver data source:
- Do one of the following:
- To create a User data source, in the User DSN tab, choose Add.
–Or–
- To create a System data source, choose the System DSN tab, and then choose Add.
- To create a User data source, in the User DSN tab, choose Add.
- In the Create New Data Source dialog box, choose Easysoft ODBC-QuickBooks Desktop Driver, and then choose Finish.
- Complete the Easysoft ODBC-QuickBooks Desktop Driver DSN Setup dialog box.
- Use the Test button to verify that you can successfully connect to QuickBooks.
Example: Incremental Data Push from Excel into Salesforce.com
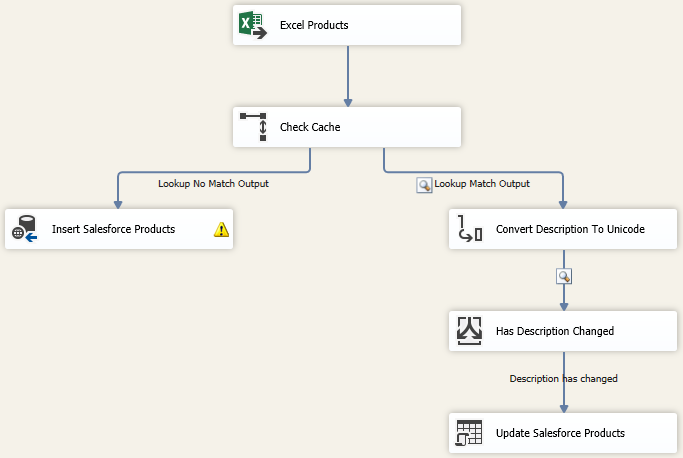
The SSIS package in this section compares product records in an Excel spreadsheet against a reference data set stored in an SSIS cache file. If a record is present in the spreadsheet but not in the cache, it is a new record and SSIS inserts the new record into Salesforce.com. If a record is present in both the cache and the spreadsheet, SSIS checks whether the record in the spreadsheet is different to the one in the cache. If the record has changed, SSIS updates the record in Salesforce.com.
To create this package yourself, you will need to create a linked server that connects to your Salesforce.com instance.
Step 1: Create the Excel Data
- Create a new Excel spreadsheet.
- In the first worksheet, add these sample products:
Name Description Family Easysoft ODBC-Salesforce Driver ODBC Driver for Salesforce.com, Force.com, Database.com Easysoft Data Access Easysoft ODBC-SQL Server Driver ODBC Driver for SQL Server, SQL Azure Easysoft Data Access - Save the file as a Excel 97-2003 format spreadsheet.
Step 2: Retrieve the Excel Data
- In Visual Studio, create a new Integration Services Project.
- Drag a Data Flow Task from the Toolbox to the Control Flow tab.
- Choose the Data Flow tab.
- Drag an Excel Source from the Toolbox to the Data Flow tab, and then press Return.
Excel Source is under the Other Sources list.
- In the Excel Source Editor dialog box, choose New.
- In the Excel Connection Manager dialog box, use the Browse button to locate the Excel spreadsheet that contains the records you want to push into Salesforce.com.
- In the Name of the Excel sheet list, choose Sheet1$, and then choose OK.
- Name your Excel Source "Excel Products".
Step 3: Create The Cache
- Drag a Cache Transform transformation from the Toolbox to the Data Flow tab, and then press Return.
Cache Transform is under the Other Transforms list.
- In the Cache Transformation Editor dialog box, choose New.
- In the Cache Connection Manager dialog box, select Use file cache, and then type a cache file name in the space provided. For example, "mynewcache.caw".
- In the Columns tab, change the Index Position of the name column to 1. Then use the OK button to return to the Data flow tab.
- Choose the Control flow tab, and then name the Data Flow task "Create Cache".
- Create a copy of "Create Cache" and name the copy "Check Cache".
- Select "Check Cache", and then press Return.
- In the Data flow tab, delete the Cache Transform transformation (which is a redundant copy).
Step 4: Check the Cache For Changes
- Drag a Lookup transformation from the Toolbox to the Data Flow tab, below "Excel Products".
The Lookup transformation is under the Common list.
- Select "Excel Products" and then drag the blue arrow over to the Lookup transformation.
- Select the Lookup transformation, and then press Return.
- In the Lookup Transformation Editor, in the Cache mode list, choose Full cache.
- In the Specify how to handle rows with no matching entries list, choose Redirect rows to no match output.
- Click Columns.
- Drag the Name column from the Available Input Columns list over to the Name column in the Available Lookup Columns list.
- In the Available Lookup Columns list, select the check box that is next to the Description column.
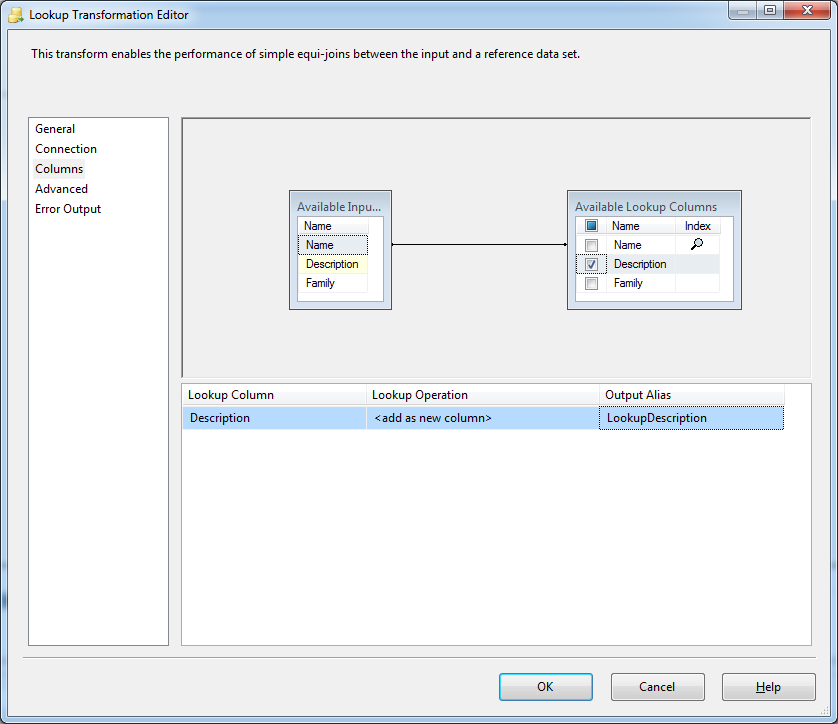
- In the Output Alias field, type "LookupDescription". Choose OK.
- Name your Lookup Transformation "Check Cache".
Step 5: Insert New Records
- Drag an ODBC Destination from the Toolbox to the Data Flow tab, below and to the left of "Check Cache".
ODBC Destination is in the Other Destinations list.
- Select "Check Cache". Drag the blue arrow over to the ODBC Destination.
- In the Input Output Selection dialog box, in the Output list, select Lookup No Match Output. Then choose OK.
- Select the ODBC Destination, and then press Return.
- In the ODBC Destination dialog box, choose New.
- In the Configure ODBC Connection Manager dialog box, choose New.
- In the Connection Manager dialog box, choose your Salesforce.com ODBC data source, and then use the OK button to return to the ODBC Destination dialog box.
- In the Name of the table or the view list, choose Product2.
- Choose Mappings.
- Map the Name, Description and Family columns in the Input list to the same columns in the Destination list. Then choose OK.
- Name your ODBC Destination "Insert Salesforce Products".
Step 6: Update Changed Records
- Drag a Data Conversion transformation from the Toolbox to the Data Flow tab, below and to the right of "Check Cache".
- Select "Check Cache". Drag the blue arrow over to the Data Conversion transformation.
- Select the Data Conversion transformation, and then press Return.
- In the Data Conversion Transformation Editor, in the Available Input Columns, select LookupDescription.
- In the Data Type column, choose "Unicode string [DT_WSTR]".
- Name your Data Conversion transformation "Convert Description To Unicode".
- Drag a Conditional Split transformation from the Toolbox to the Data Flow tab, below the Data Conversion transformation.
The Conditional Split transformation is in the Common list.
- Select the Data Conversion transformation. Drag the blue arrow over to Conditional Split transformation.
- Select the Conditional Split transformation and press Return.
- In the Conditional Split Transformation Editor, in the Output Name box, type "Description has changed".
- In the Condition box, type "Description != [Copy of LookupDescription]". Then choose OK.
- Name your Conditional Split transformation "Has Description Changed".
- Drag an OLE DB Command from the Toolbox to the Data Flow tab, below "Has Description Changed".
The OLE DB Command transformation is in the Common list.
- Select "Has Description Changed". Drag the blue arrow over to the OLE DB Command.
- In the Input Output Selection dialog box, in the Output list, choose Description has changed.
- From the Project menu, choose New Connection Manager.
- In the Add SSIS Connection Manager dialog box, in the Connection manager type list, choose OLEDB. Then choose Add.
- In the Configure OLE DB Connection dialog box, in the Data connections field, choose the SQL Server instance from which you created the linked server to Salesforce.com. Then choose OK.
- Select the OLE DB Command and press Return.
- In the Advanced Editor for OLE DB Command dialog box, in the Connection Manager list, choose your new Connection Manager.
- In the Component Properties tab, in the SqlCommand field, type the following statement:
update <linked_server>.SF.DBO.Product2
set Description = ?
where Name = ?
- In the Column Mappings tab, drag the Name column from the Available Input Columns list over to the Param_1 parameter in the Available Destination Columns list.
- Drag the Description column from the Available Input Columns list over to the Param_0 parameter in the Available Destination Columns list. Then choose OK.
- Name your OLE DB Command "Update Salesforce Products".
To populate the reference cached data set, navigate to the "Create Cache" Data Flow task and choose the Start button. To prevent the cached data set from being updated, in the Control flow tab, disable "Create Cache". To insert new or changed records, run the "Check Cache" Data flow task.
Example: Incremental Data Pull from Salesforce.com into SQL Server
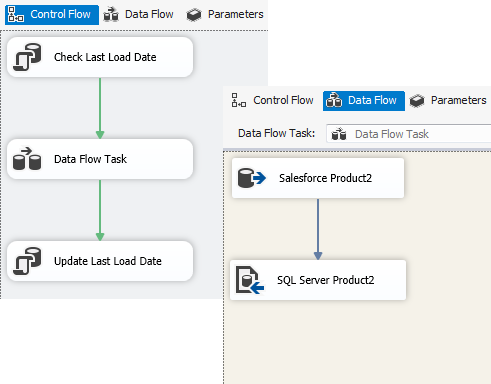
The SSIS package in this section shows how to retrieve and insert new Salesforce records into SQL Server. A SQL Server table is used to record each time the package is run. Only those Salesforce.com records that have been added since the package was last run are retrieved and inserted.
To create this package yourself, you will need to create a linked server that connects to your Salesforce.com instance.
Step 1: Create the SQL Server Tables
- In Microsoft SQL Server Management Studio, connect to the SQL Server instance that serves the database where you want to insert your Salesforce.com data.
- Choose New Query, and then run the following SQL statements:
create table ControlTable (SourceObject nvarchar(50) primary key not null,
                           LastLoadDate datetime not null)
insert into ControlTable values ('Product2', 01/01/1900)
create table Product2 (Id nvarchar(18), Name nvarchar(255), ProductCode nvarchar(255),
                       Description nvarchar(max), IsActive smallint,
                       CreatedDate datetime, CreatedById nvarchar(18),
                       LastModifiedDate datetime, LastModifiedById nvarchar(18),
                       SystemModstamp datetime, Family nvarchar(40),
                       IsDeleted smallint)
Step 2: Initialise the Load Date
- In Visual Studio, create a new Integration Services Project.
- Choose Variables from the SSIS menu.
- Click the
 button.
 - Set the Variable settings to match those shown in the following table:
Name Data type Value Product2LoadDate DateTime 01/01/1900
Step 3: Check When the Package was Last Run
- Drag an Execute SQL Task from the Toolbox to the Control Flow tab.
- Select the Execute SQL Task and press Return.
- In the Execute SQL Editor, in the Connection field, choose <new connection...>
- In the Configure OLE DB Connection Manager dialog box, select the SQL Server instance which serves the database where you created the control table. Then choose OK.
- In the SQLStatement field, type the following query:
select LastLoadDate from ControlTable where SourceObject = 'Product2'
- Choose Result Set in the left pane, and then choose Add.
- In the Result Name field, type "LastLoadDate".
- In the Variable Name field, type "User::Product2LoadDate". Choose OK.
- Name the Execute SQL Task "Check Last Load Date".
- Drag a Data Flow Task from the Toolbox to the Control Flow tab, below "Check Last Load Date".
- Select "Check Last Load Date" and then drag the green arrow over to the Data Flow Task.
Step 4: Retrieve the New Records
- Choose the Data Flow tab.
- Drag an OLE DB Source from the Toolbox to the Data Flow tab, and then press Return.
OLE DB Source is under the Other Sources list.
- In the OLE DB Source Editor, choose New.
- In the Configure OLE DB Connection Manager dialog box, choose New.
- In the Connection Manager dialog box, choose the SQL Server instance from which you created the linked server to Salesforce.com. Use the OK button to return to the OLE DB Source Editor dialog box.
- In the Data access mode list, choose SQL command.
- In the SQL command text box, type the following query:
select * from <linked_server>.SF.DBO.Product2 where CreatedDate > ? and
                                                      CreatedDate < ?
- Choose Parameters.
- In the Set Query Parameters dialog box, set the parameter mappings:
Parameters Variables Param direction Parameter0 User::Product2LoadDate Input Parameter1 System::StartTime Input The first parameter ensures that only those Salesforce records that were created since the package was last run are retrieved. The second parameter excludes records that were added while the package is running.
Then use the OK button to return to the Data Flow tab.
- Name the OLE DB Source "Salesforce Product2".
Step 5: Insert the New Records
- Drag a SQL Server Destination from the Toolbox to the Data Flow tab, below "Salesforce Product2", and then press Return.
SQL Server Destination is under the Other Destinations list.
- Select "Salesforce Product2" and then drag the blue arrow over to the SQL Server Destination.
- Select the SQL Server Destination and press Return.
- In the SQL Server Destination Editor dialog box, choose the SQL Server instance that serves the database where you created the Product2 table.
- In the Use a table or view list, choose the Product2 table.
- Click Mappings.
- Set the Mappings as follows:
Input Column Destination Column Id Id Name Name ProductCode ProductCode Description Description <ignore> IsActive <ignore> CreatedDate CreatedById CreatedById <ignore> LastModifiedDate LastModifiedId LastModifiedId <ignore> SystemModstamp Family Family <ignore> IsDeleted Note It is possible to insert the "ignored" columns into SQL Server, however that would require a data conversion transformation to be applied to them, and that is beyond the scope of this tutorial.
- Name the SQL Server Destination "SQL Server Product2".
- Select the Control Flow tab.
- Drag an Execute SQL Task from the Toolbox to the Control Flow tab, below the Data Flow task.
- Select the Data Flow task and then drag the green arrow over to the Execute SQL Task.
- Select the Execute SQL Task, and then press Return.
- In the Execute SQL Task Editor, in the Connection list, choose the SQL Server instance that serves the database where you created the ControlTable.
- In the SQLStatement box, type the following statement:
update ControlTable
set LastLoadDate = ?
where SourceObject = 'Product2'
- Choose Parameter Mapping in the left pane, and then choose Add.
- In the Variable Name field, choose System::StartTime.
- In the Data Type field, choose Date.
- In the Parameter Name field, type 0. Then choose OK.
- Name the Execute SQL Task "Update Last Load Date"
- Choose the Start button to retrieve and insert the Salesforce data into SQL Server.
Example: Merging Salesforce.com and QuickBooks Data
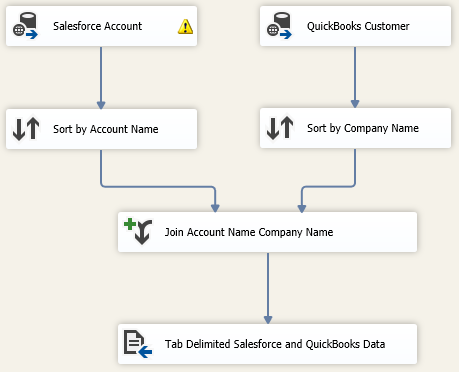
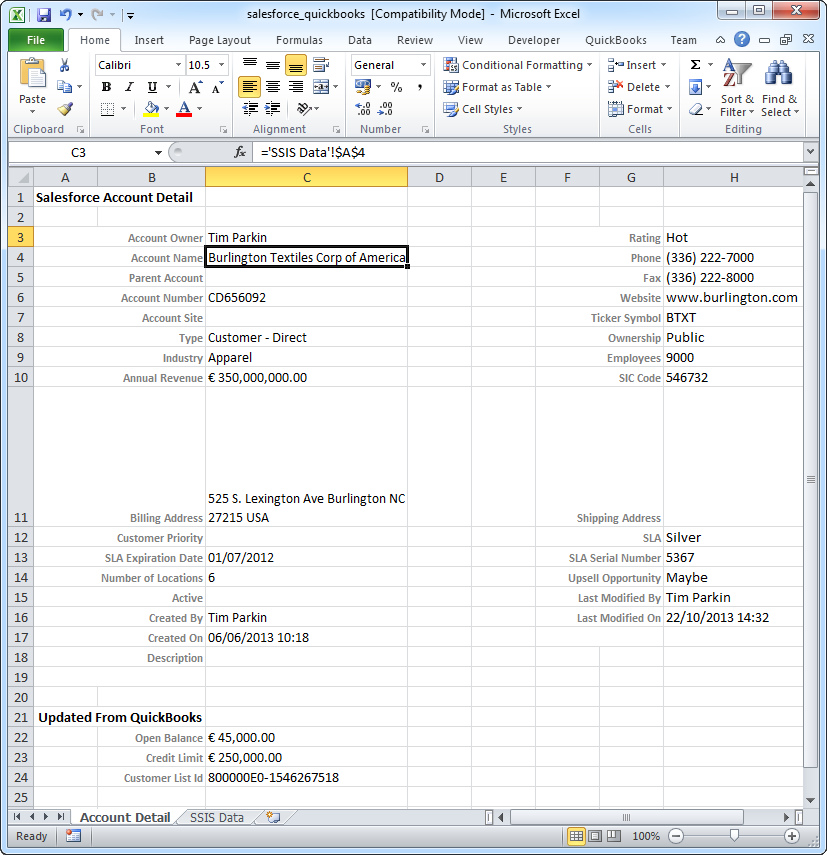
This example shows how to use the Easysoft's Salesforce.com ODBC driver and Quickbooks ODBC driver to merge information stored in the Salesforce.com Account table and the Quickbooks Customer table. Because SSIS is used to control the merge, it is possible to change the solution and alter what data gets merged or merge different data. Salesforce.com and Quickbooks themselves are not changed, i.e. no tables are created in either product to facilitate the merge.
The resultant merged data is written to a delimited file, which can then be imported into other applications such as Microsoft Excel. This scenario is illustrated in the image shown at the start of the article.
Step 1: Retrieve the Data
- In Visual Studio, create a new Integration Services Project.
- Drag a Data Flow Task from the Toolbox to the Control Flow tab.
- Choose the Data Flow tab.
- Drag an ODBC source from the Toolbox to the Data Flow tab, and then press Return.
ODBC Source is under the Other Sources list.
- In the ODBC Source Editor, choose New.
- In the Configure ODBC Connection Manager dialog box, choose New.
- In the Connection Manager dialog box, choose your Salesforce.com ODBC data source from the Use user or system data source name list. Use the OK button to return to the ODBC Source dialog box.
- In the Data access mode list, choose SQL command.
- Type the following query in the SQL command text box:
SELECT U1.name AS "Account Owner", A1.name AS "Account Name",
        A2.name AS "Parent Account", A1.AccountNumber AS "Account Number",
        A1.Site AS "Account Site", A1.Type AS "Type", A1.Industry AS "Industry",
        A1.AnnualRevenue AS "Annual Revenue",
        A1.BillingStreet AS "Billing Address Line 1",
        A1.BillingCity AS "Billing Address Line 2",
        A1.BillingState AS "Billing Address Line 3",
        A1.BillingPostalCode AS "Billing Address  Line 4",
        A1.BillingCountry AS "Billing Address Line 5",
        A1.CustomerPriority__c AS "Customer Priority",
        A1.SLAExpirationDate__c AS "SLA Expiration Date",
        A1.NumberofLocations__c AS "Number of Locations", A1.Active__c AS "Active",
        U2.name AS "Created By", A1.CreatedDate AS "Created On",
        A1.Description AS "Description", A1.Rating AS "Rating", A1.Phone AS "Phone",
        A1.Fax AS "Fax", A1.Website AS "Website", A1.TickerSymbol AS "Ticker Symbol",
        A1.Ownership AS "Ownership", A1.NumberOfEmployees AS "Employees",
        A1.Sic AS "SIC Code", A1.ShippingStreet AS "Shipping Address Line 1",
        A1.ShippingCity AS "Shipping Address Line 2",
        A1.ShippingState AS "Shipping Address Line 3",
        A1.ShippingPostalCode AS "Shipping Address Line 4",
        A1.ShippingCountry AS "Shipping Address Line 5",
        A1.SLA__c AS "SLA", A1.SLASerialNumber__c AS "SLA Serial Number",
        A1.UpsellOpportunity__c AS "Upsell Opportunity",
        U3.name AS "Last Modified By", A1.LastModifiedDate AS "Last Modified On"
FROM Account A1 LEFT OUTER JOIN Account A2 ON A2.Id = A1.ParentId,
     "User" U1, "User" U2, "User" U3
WHERE A1.OwnerId=U1.Id AND A1.CreatedById=U2.Id AND A1.LastModifiedById=U3.Id;
This SQL query retrieves the information shown in the Account detail page in Salesforce.
- Choose Preview, and then choose OK to exit the dialog boxes.
- Name your ODBC source "Salesforce Account".
- Drag an ODBC source from the Toolbox to the Data Flow tab, to the right of Salesforce Account, and then press Return.
- In the ODBC Source Editor, choose New.
- In the Configure ODBC Connection Manager dialog box, choose New.
- In the Connection Manager dialog box, choose your Quickbooks ODBC data source from the Use user or system data source name list. Use the OK button to return to the ODBC Source dialog box.
- Type the following query in the SQL command text box:
SELECT CompanyName, OpenBalance AS "Open Balance", CreditLimit AS "Credit Limit",
        ListId AS "Customer List Id"
FROM Customer
This SQL query retrieves the open balance and credit limit for the Salesforce account. This information is stored in the QuickBooks customer list.
- Choose Preview, and then choose OK to exit the dialog boxes.
- Name your ODBC source "QuickBooks Customer".
Step 2: Sort and Merge the Data
- Drag a Sort transformation from the Toolbox to the Data Flow tab, below "Salesforce Account".
The Sort transformation is under the Common list.
- Select "Salesforce.com Account" and then drag the blue arrow over to the Sort transformation.
- Select the Sort transformation, and then press Return.
- In the Sort Transformation Editor, select the check box that is to the left of the Account Name column.
- Select Remove rows with duplicate sort values and then choose OK.
- Name your Sort transformation "Sort by Account Name".
- Drag a Sort transformation from the Toolbox to the Data Flow tab, below "QuickBooks Customer".
- Select "QuickBooks Customer" and then drag the blue arrow over to the Sort transformation.
- Select the Sort transformation, and then press Return.
- In the Sort Transformation Editor, select the check box that is to the left of the Company Name column.
- Select Remove rows with duplicate sort values and then choose OK.
- Name your Sort transformation "Sort by Company Name".
- Select "QuickBooks Customer" and then drag the blue arrow over to "Sort by Company Name".
- Drag a Merge Join transformation from the Toolbox to the Data Flow tab, below and between the Sort transformations, and then press Return.
The Merge Join transformation is under the Common list.
The Merge Join transformation allows data in different data sources to be merged.
- Select "Salesforce Account", and then drag the blue arrow over to the Merge Join transformation.
- In the Input Output Selection dialog box, choose Merge Join Left Input from the Input list, and then choose OK.
- Select "QuickBooks Customer", and then drag the blue arrow over to the Merge Join transformation.
- Select the Merge Join transformation, and then press Return.
- In the Merge Join Transformation editor, make sure that the Join Key check box, to the right of Account Name, is selected.
- In the Sort by Account Name box, select the check box in the top left corner.
- In the Sort by Company Name box, select the check box to the left of Open Balance, Credit Limit and Customer List Id. Then choose OK.

- Name your Merge Join transformation "Join Account Name Company Name".
Step 3: Output the Merged Data
- Drag a Flat File Destination from the Toolbox to the Data Flow tab, below "Join Account Name Company Name".
Flat File Destination is in the Other Destinations list.
- Select "Join Account Name Company Name", and then drag the blue arrow over to the Flat File Destination.
- Select the Flat File Destination, and then press Return.
- In the Flat File Destination Editor dialog box, choose the New button.
- Accept the default format when prompted.
- In the Flat File Connection Manager Editor dialog box, in the File name box, type the name of the text file you want the Salesforce and QuickBooks data to be written to.
- Make sure that the Unicode check box is selected.
- Choose Columns.
- Choose "Tab {t}" from the Column delimiter list.
The default delimiter, "Comma {,}", is not appropriate because some of the Salesforce data may contain commas.
- Choose OK to return to the Data Flow tab.
- Name the Flat File Destination "Tab Delimited Salesforce and QuickBooks Data".
- Choose the Start button to retrieve and merge the Salesforce and QuickBooks data.